We may not have been in person at Brighton this year, but that doesn’t mean that there was no opportunity to learn a bunch of new things. A massive thanks to the whole BrightonSEO team for all their hard work putting together such a successful event.
And just because we couldn’t see him in real life, we still got to hear from Kelvin before each talk (anyone else have his introduction memorized by the end of day 1?)
I am going to have Kelvin’s short talk intro memorised by the end of tomorrow
— Kestra ✨ (@kalmgirl) October 1, 2020
We’ve already kicked things off with part 1 of our 2020 BrightonSEO recap, but there were so many great talks during the course of the event that one post just won’t cut it.
My two days were full of technical SEO talks from the likes of Miracle Inameti-Archibong, Faye Watt, Andy Davies, Roxana Stingu, Fabrice Canel and Polly Pospelova.
There were so many amazing talks and I wish I could have covered them all, but lucky for us Chris Johnson collated all of this years slides over on seoslides!
How to maximize your site’s crawl efficiency – Miracle Inameti-Archibong
Miracle is the head of SEO at Erudite agency and spoke about the often misunderstood topic of crawl budget. She started off by answering the age-old question, why worry about crawl budget?
Google has said several times that crawl budget isn’t an issue for most sites, however, if you are a large publishing or eCommerce website with thousands of pages being added regularly, then crawl budget is something you will want to consider.
What is crawl budget?
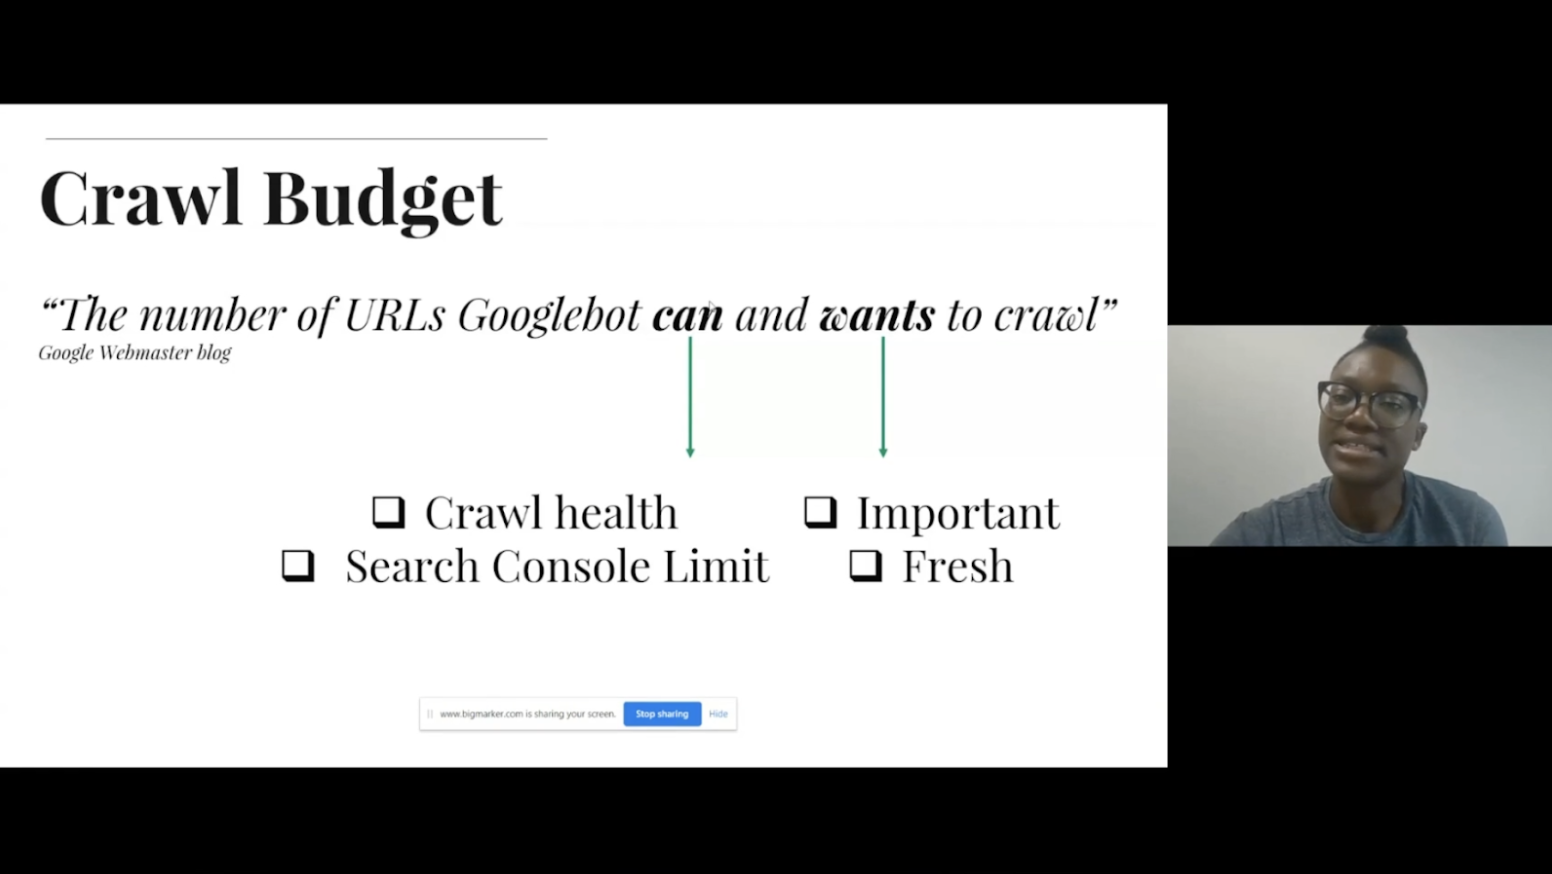
Put simply, crawl budget equates to the number of URLs Googlebot can and want to crawl. For Google, the can is things such as your crawl health and factors that are affecting whether they can crawl your site. Making Google want to crawl your site is ensuring your content is important and up to date.
Analyse your site crawl
The first step to finding out whether Google can crawl your site is to crawl your site yourself using a cloud-based crawler. For large websites, Miracle recommends investing in a good cloud-based crawling solution, which displays useful information with an easy to use interface.
When crawling large sites it’s important to crawl tactically, this is useful to discover all pages on your website and identify if there is any crawl waste. It’s therefore helpful to include exclusions in order to crawl sections of your site at a time.
Identify waste
Once you have crawled your site the next step is to identify areas of waste, one way to do this is to use the crawl stats report in Google Search Console. You can then compare the number of average URLs crawled with the number of valid URLs found in the index coverage report, and how many URLs are excluded.
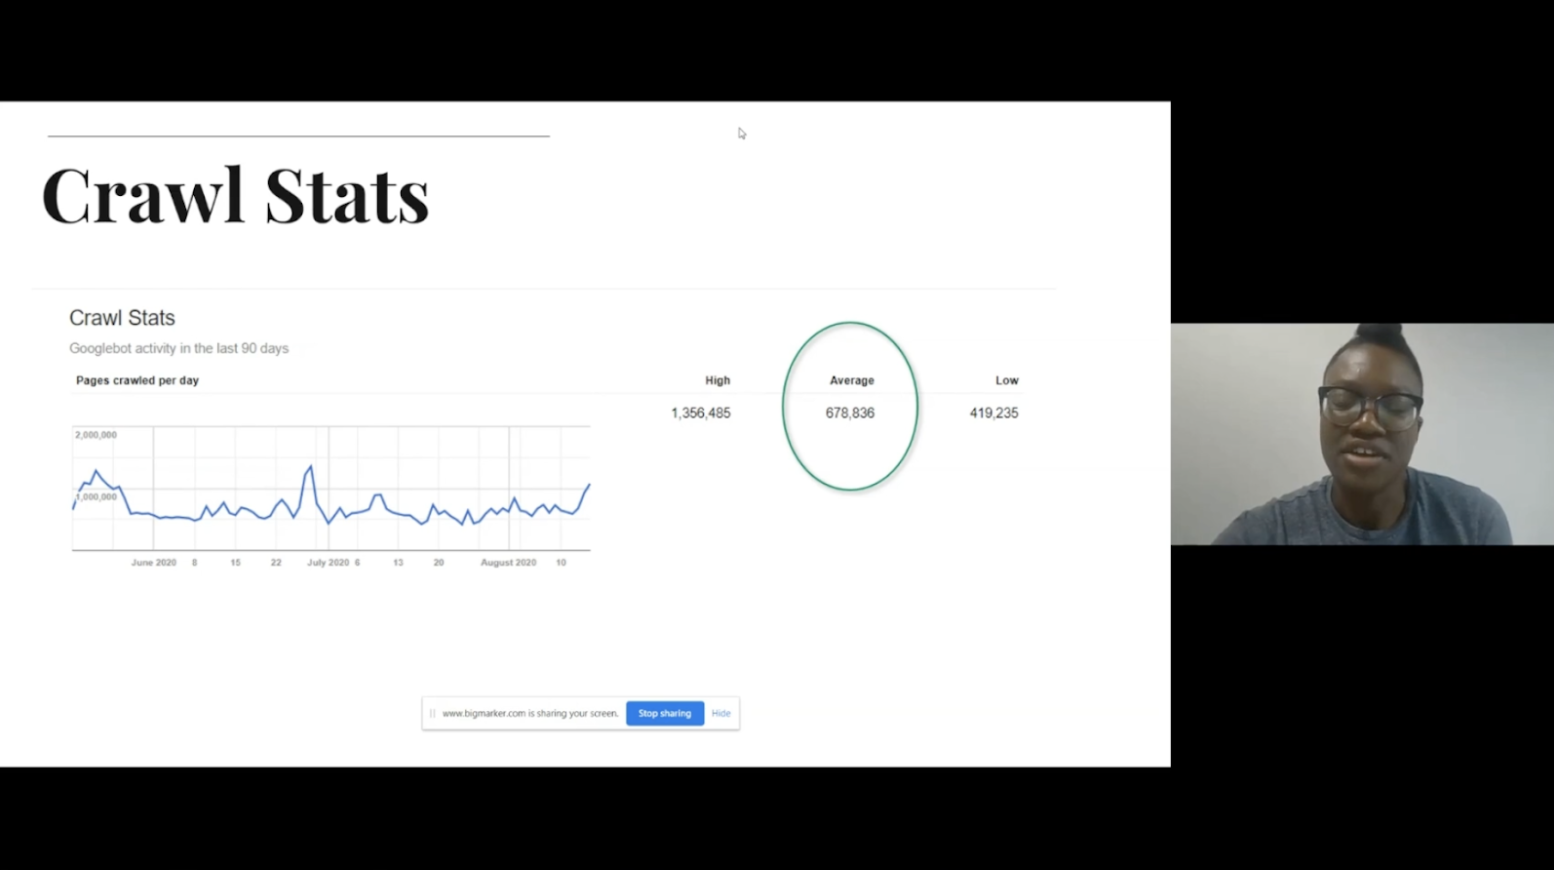
Looking into these reports will enable you to quickly identify any areas of waste, for example, pages with redirects, pages with incorrect canonicals, and soft 404s.
You can also use the site: search command to identify how many of your URLs have been included in Google’s index. If there is a large discrepancy between the number of pages found here, and the number of pages submitted in your sitemap, this could also identify areas of waste.
Identify which pages are being crawled
In order to identify which pages on your site are being crawled it’s important to review your log files. As Miracle says, log files are a goldmine because they are the only true way of discovering which pages Google, and other bots, are crawling.
A web server log contains a record of page requests for a website, from both humans and robots. Once you have access to your log files, review them to see how often Google crawls your site compared to the amount of content you publish. A log file will tell you;
- Which search engine crawled your site
- Whether it was a mobile or desktop crawler
- The time it came to crawl your site
- Which URLs are crawled the most
- Which resources are requested the most
- Which response codes are returned
This will help you to;
- Identify which pages are considered important by Google
- Discover areas of waste, for example if old resources are being crawled
- Discover pages, or areas of your site, which are not being crawled
Factors affecting the number of URLs spiders can crawl
There are a number of factors that can affect how search engines crawl your site, Miracle shared some examples of these;
- Faceted navigation to help users filter through pages and products creating dynamic URLs
- Dynamically generated pages
- Server capability – crawlers aim to respect your site and don’t want to break it, so if the server is unable to handle the crawl they will retreat and stop crawling
- Spider traps and loops
- Orphan pages – you may discover that Google has been crawling pages which are not internally linked to on your site, it’s important to identify how they have found these
- JavaScript and Ajax links – for example view more links or infinite scrolling, if these are implemented using ajax, with no html link, crawlers will not be able to discover any pages past the initial one
Factors affecting the number of URLs spiders want to crawl
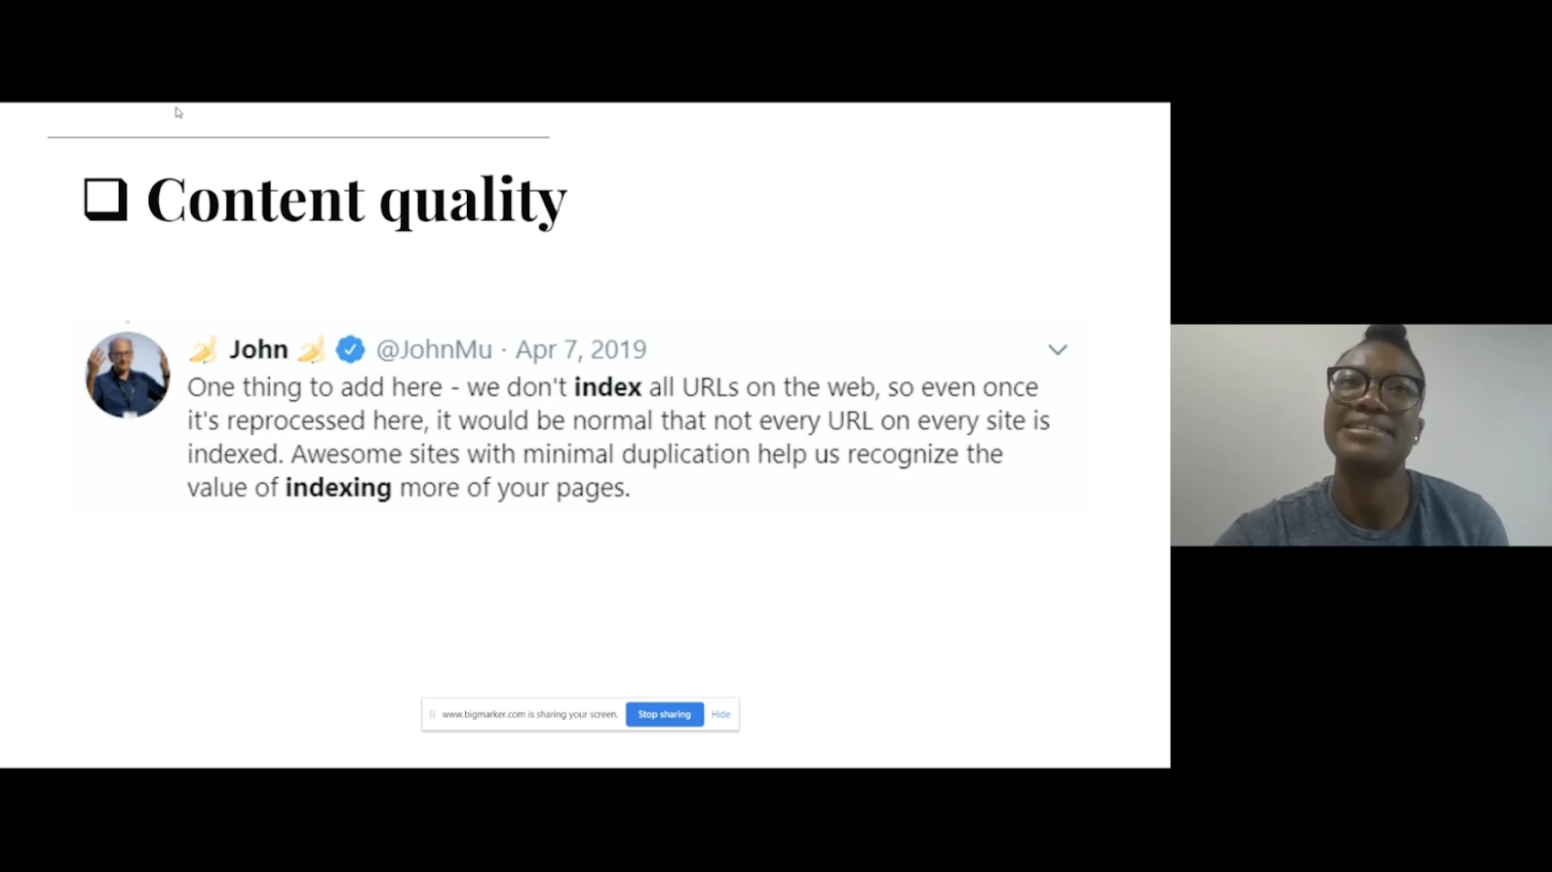
Google has said that they want to index pages that are important and high quality, so when publishing content consider how much value it will be generating for users and how unique it is for those searching for something similar. As Miracle says, we need to be prioritizing content quality over quantity.
Another factor is stale content, rather than just leaving content to become outdated, ensure you are updating your content if there is more value to be added. Google aims to index fresh content, so it’s important to continually update your pages where possible.
Optimise your content
After discovering the issues which are preventing Google from crawling and indexing your site, the next step is to optimise your sitemap in order to optimise crawl efficiency.
Your robots.txt should be used wisely to tell search engines which pages they should crawl and which ones they should not.
Next, you will want to break up your sitemap, especially if you have a large site. It’s easier to gain a more granular view of your site, and what Google is indexing if you break up your sitemap. This will also help you to identify issues and fix them easily. In addition to breaking up your sitemap, you will also want to ensure your sitemap is kept up to date. This includes setting rules for which pages should be added to the sitemap and to ensure old pages are removed.
Optimise your discovery
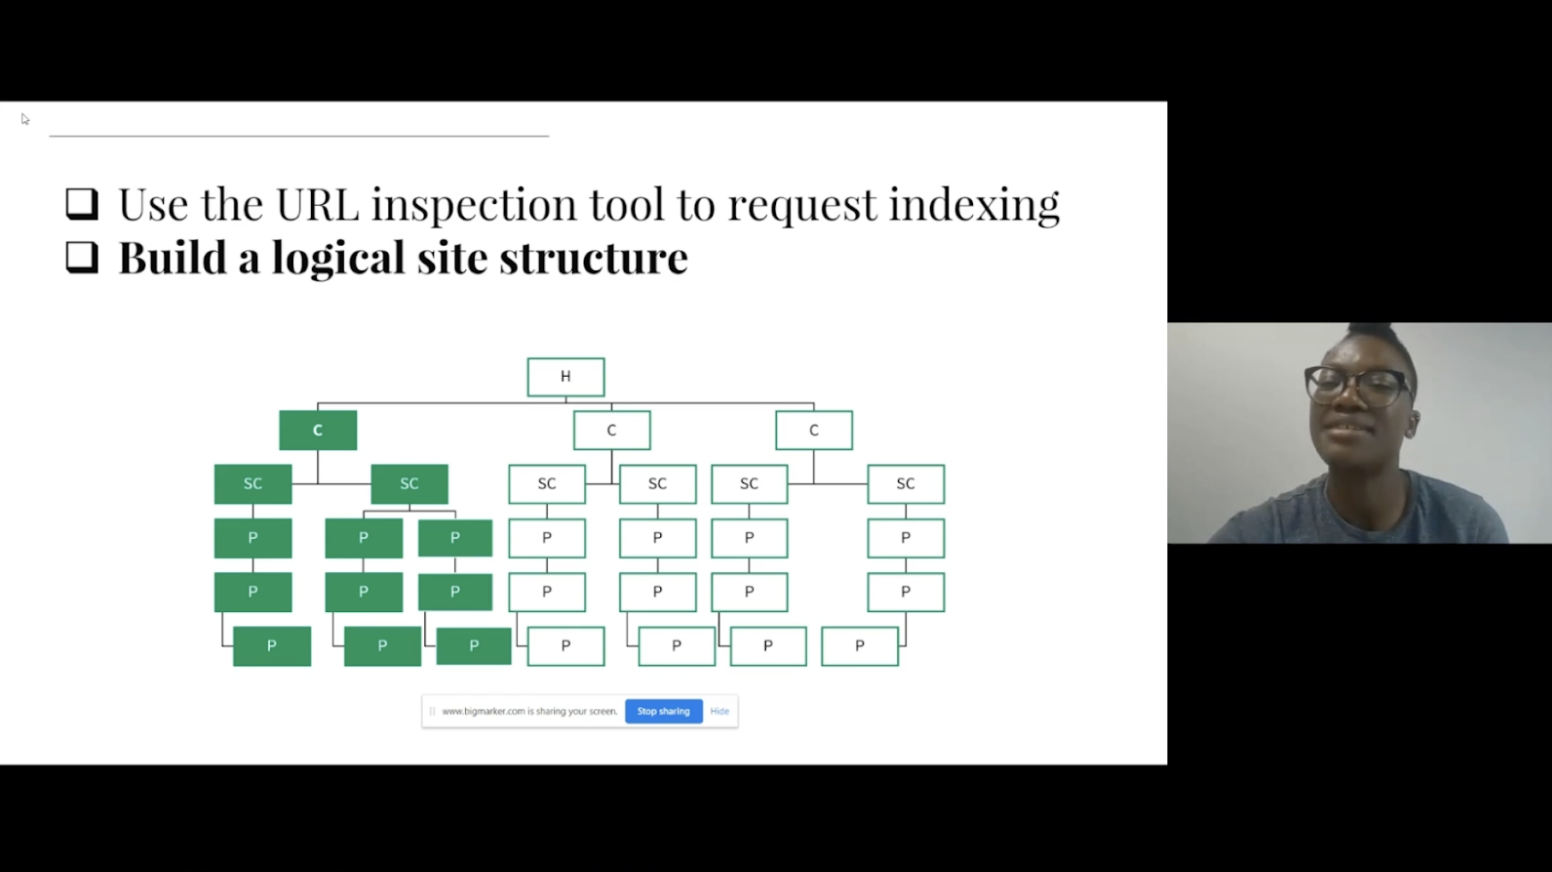
One way Miracle recommends for optimizing discovery is to use the URL inspection tool to request indexing for pages which are not currently included in the index, or newly published content.
The next recommendation is to build a logical site structure, with a clear hierarchy that is easy for both search engine crawlers and users to follow.
Another recommendation Miracle gave was to use breadcrumb navigation, especially for product pages as they are often hidden in pagination and it is not always easy, or logical, to internally link to them. By identifying important content from log files, you will be able to ensure that you are including links from important pages to others, in order to help pass authority throughout the site.
Reducing the Speed Impact of Third-Party Tags – Andy Davies
Andy is a web performance consultant who works with clients to help them make their websites faster. One thing he has discovered working with numerous consuming facer brands is that most websites use third party tags, sometimes for external use and sometimes internal purposes.
There are a lot of tags to choose from, and all do slightly different things. But they all have one thing in common; they all compete with our content for network bandwidth as they download and CPU processing time as they execute. This competition means that sites which have third party tags are often slower than if they don’t have those tags. However, third party tags are often critical for the functioning of websites, so while removing them can make a site faster, it can also break the site.
How do we balance tags’ value versus their impact
The first place to start is to audit the third party tags you have on your site, the questions you will want to ask include;
- Are we still paying for the service?
- Does anyone use it?
- Are there any duplicates?
- Where should the tag be loaded?
- What impact does the tag have on the visitors’ experience?
Page load is a journey
The process of a page loading is a journey, with milestones along the way. It goes from loading, to being useful, until it is finally usable. It’s important when reviewing the journey to understand where the third party tags fit in, it is generally recommended to load them as late as possible while ensuring they are still useful.
Tags in the head have an outsized impact, these are often the tags which stop pages from rendering and displaying content. Examples of these are;
- Tag managers
- AB or MV testing tags
- Personalisation tags
- Analytics tags
Elements of a third party tag
There are three parts to a third-party tag. First the browser has to make a connection to the server it is hosted on, then it needs to download the script before it can finally execute it. If caching is set up, however, it will only need to make the connection and download the script on the first pageview. Executing the script has to happen on every page though, which can still cause delays for visitors.
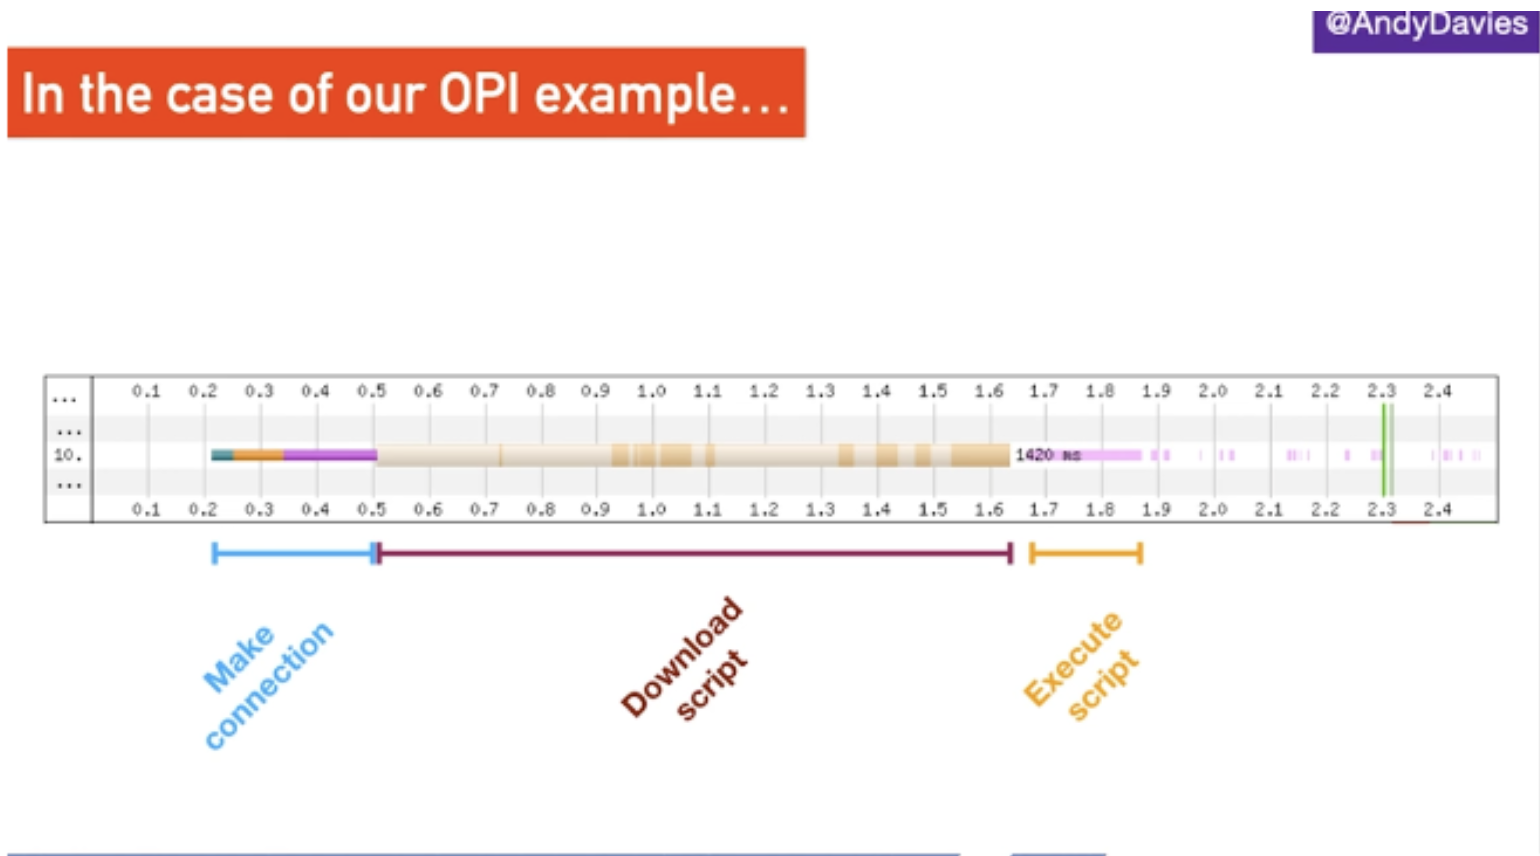
Optimising third party tags
If, once auditing your tags, there are still some which need to be included in the head, Andy considers looking into options for adding these server-side as part of the page generation. This means that the work is done before the page is sent to the visitor, rather than the user having to do it on their own device.
If we insert a really small JavaScript tag into the head, it will prevent the browser from parsing HTML until the script has been downloaded and executed and the larger the script is, the longer this takes. If the 3rd-party host is unresponsive then the browser waits until the connection times out.
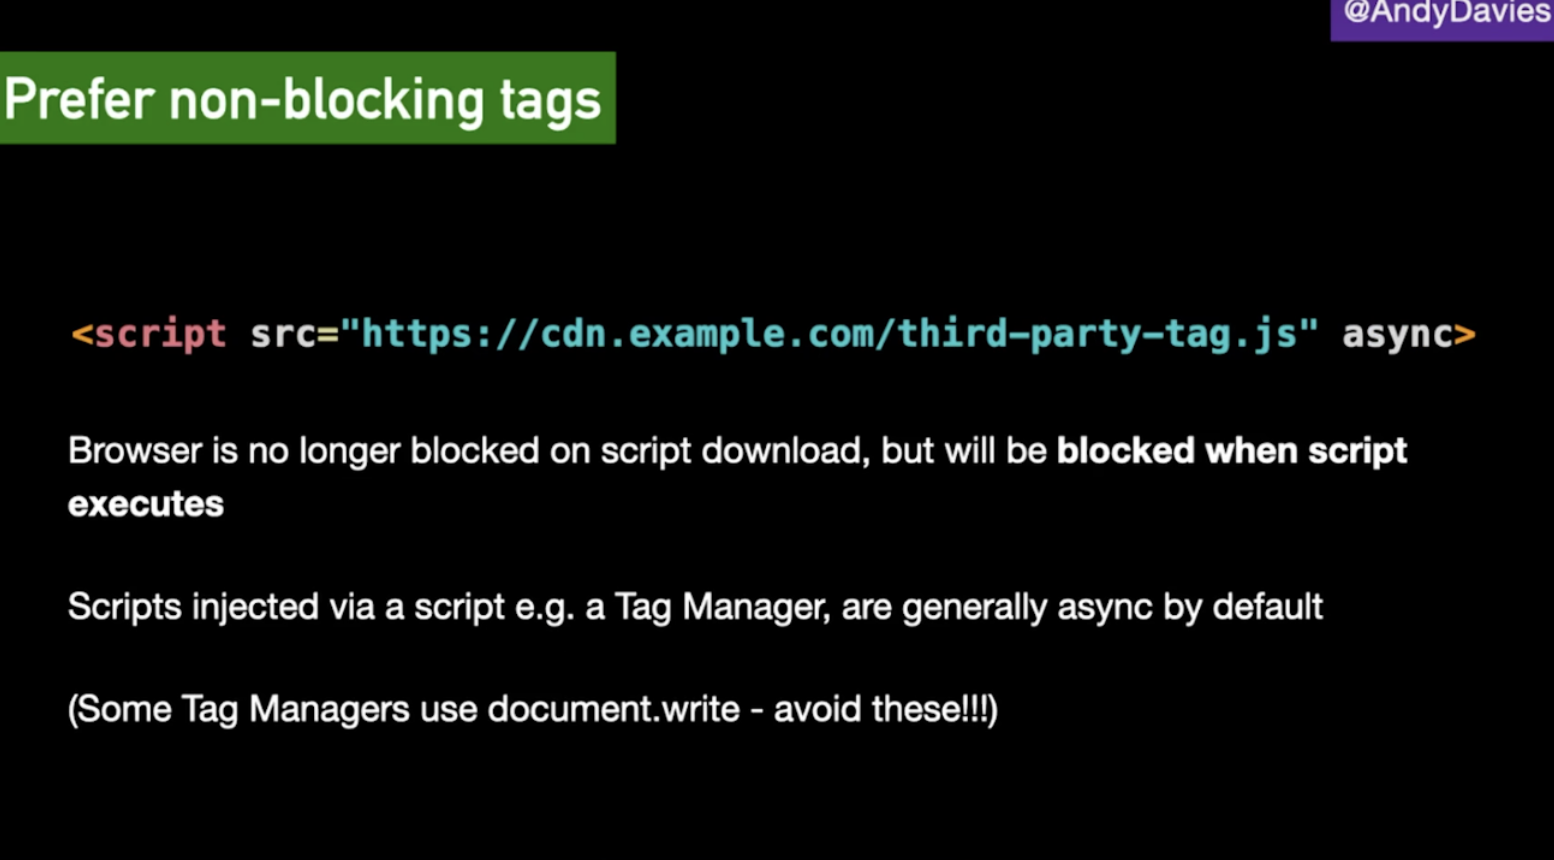
Instead, we want to ensure we are using non-blocking tags so that the browser is no longer blocked on the script download step. However, it will still be blocked when the script executes. Scripts that are injected via a Tag Manager are typically this async setup.
Tag Manager vs In Page
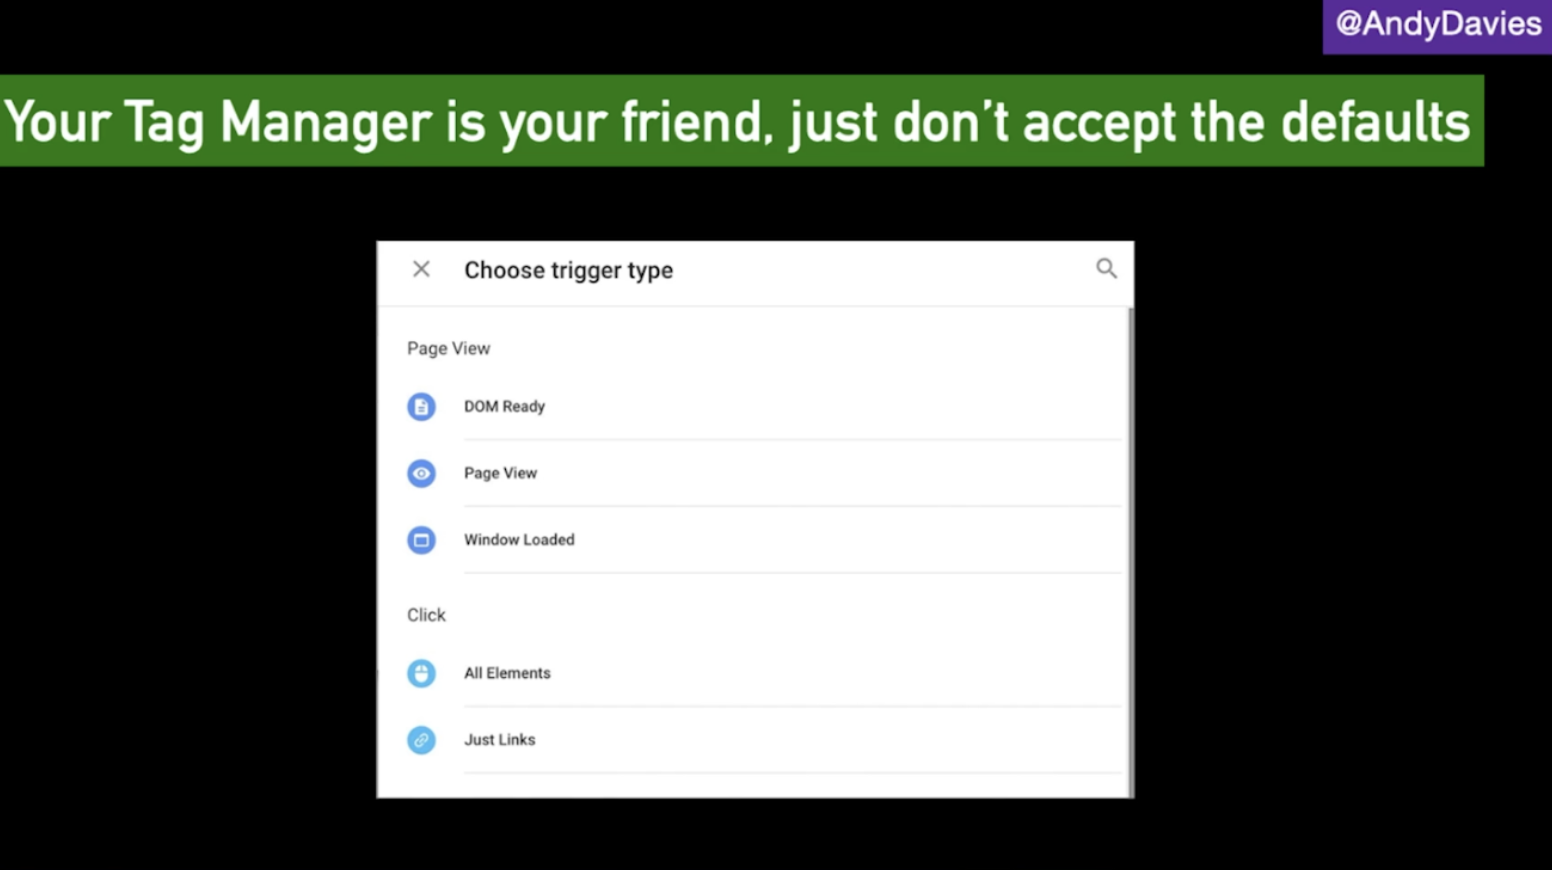
When run directly in a page’s HTML, tags will fire as soon as they are available but they may delay important content from loading or interfere with visitor interaction. In comparison, using a tag manager gives more control over when tags are run, but it means having to wait for the tag manager to load, and this may be too late. Within tag managers there is the option to choose when to load a tag, it doesn’t always have to be on page view. For example, using an onload event, or DOM ready event.
Prioritising tag loading</h3
If a tag needs user interaction, for example, a chat widget or feedback widget, which only makes sense once the page is usable, then we can deprioritize the loading and delay it from firing until the page has been loaded.
However, in terms of tags for tools such as Google Analytics, the later we load it, the more data we will lose, because some people will leave the site before the tag has loaded. So there is a question of how much data loss can you tolerate in order to consider pushing analytics tags back.
Key Takeaways
- 3rd party tags can make or break a visitor’s experience on a website
- Make sure to audit your tags and remove the ones that aren’t needed anymore
- Don’t accept the defaults from tag managers, instead choreograph tag loading
- Measure the impact of 3rd party tags on visitor experience
An SEO’s Guide to Website Migrations – Faye Watt
Faye is the SEO Manager at Seeker Digital and has worked on many migrations with her clients. She started her presentation by explaining that a website migration “is a process to describe significant changes to your website’s domain, platform, structure, content or design.”
Different types of migration include;
- Changing domain name
- Merging multiple domains into one domain
- Platform migration
- Implementing a new website design
- Moving from HTTP to HTTPS
- Or a combination of these elements
Each of these migration types has different levels of complexity.
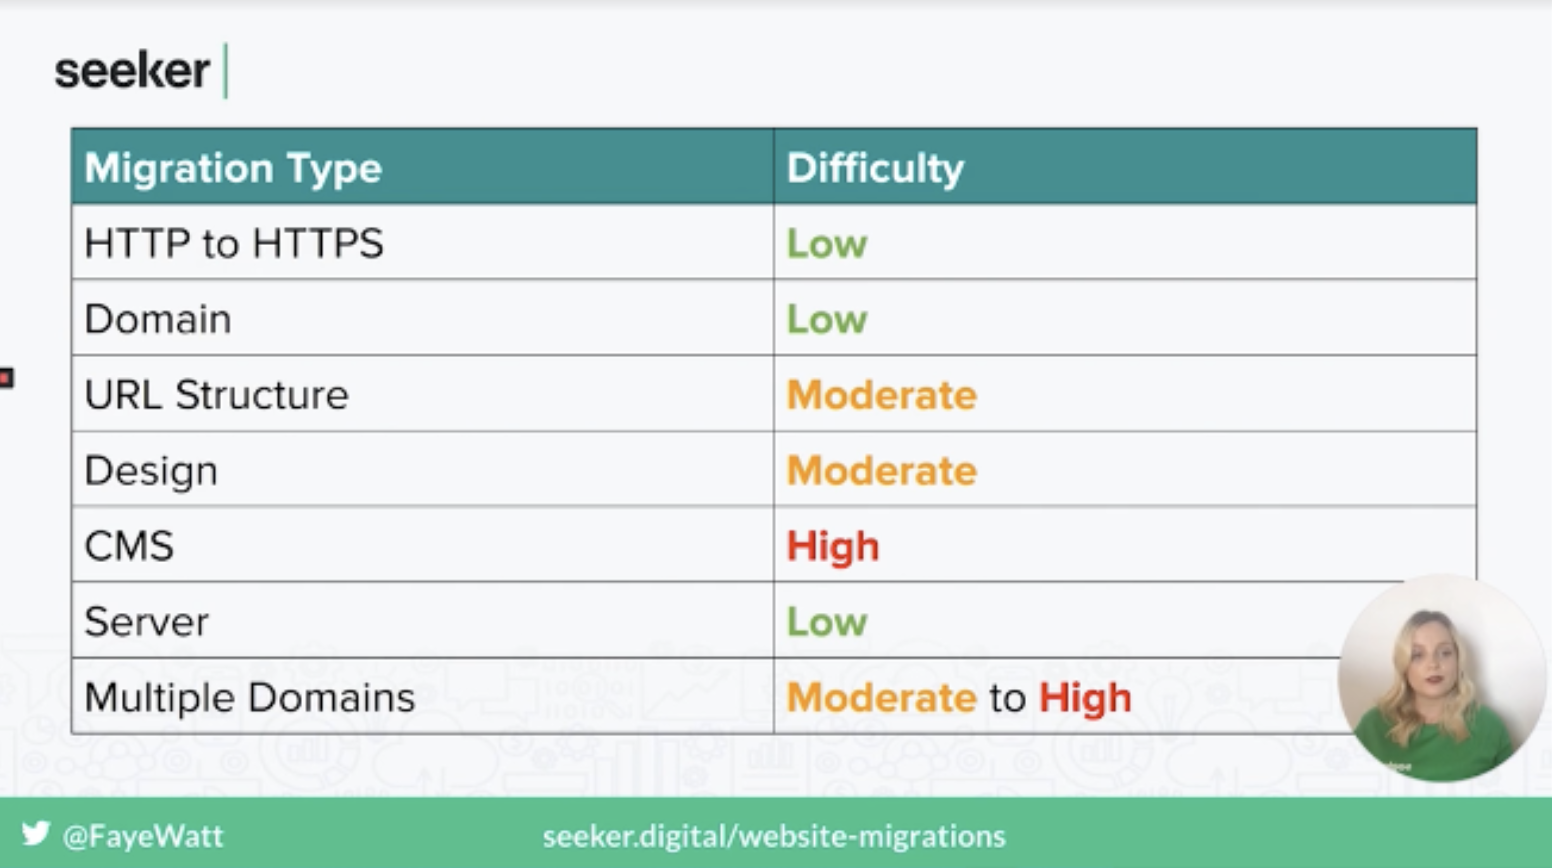
While a migration can be as straightforward as setting up URL forwarding with your DNS provider, it’s not always that easy. For example, changing URL structure will require a lot more rules, or moving large sections of your site.
Why migrations go wrong
There are a number of reasons that migrations can go wrong, including;
- Lack of planning and strategy
- Underestimating the project
- Lack of time or budget
- No SEO consultation meaning important elements are missed
- Slow to fix issues post migration
- Launch date during peak traffic period
The consequences of an incorrect migration are also wide in range;
- Loss of search visibility
- Loss in traffic
- Increase in bounce rate
- Decrease in conversion rate
- Loss of links
- Increased in page load time
How to avoid a migration disaster
When Faye performs a migration, she runs it in 6 stages, starting with the planning phase.
1. Planning Phase
The first thing to remember during this stage is to not rush, you need a lot of time to plan all of the components that go into a migration and organize all the teams that will need to be involved.
Within this stage, you will also need to identify the type of migration that will be taking place, and once this is done you can start to create a list of all the tasks that will need to be completed.
Each task will need a description, completion status, task owner, the date it was completed, and any supporting documentation.
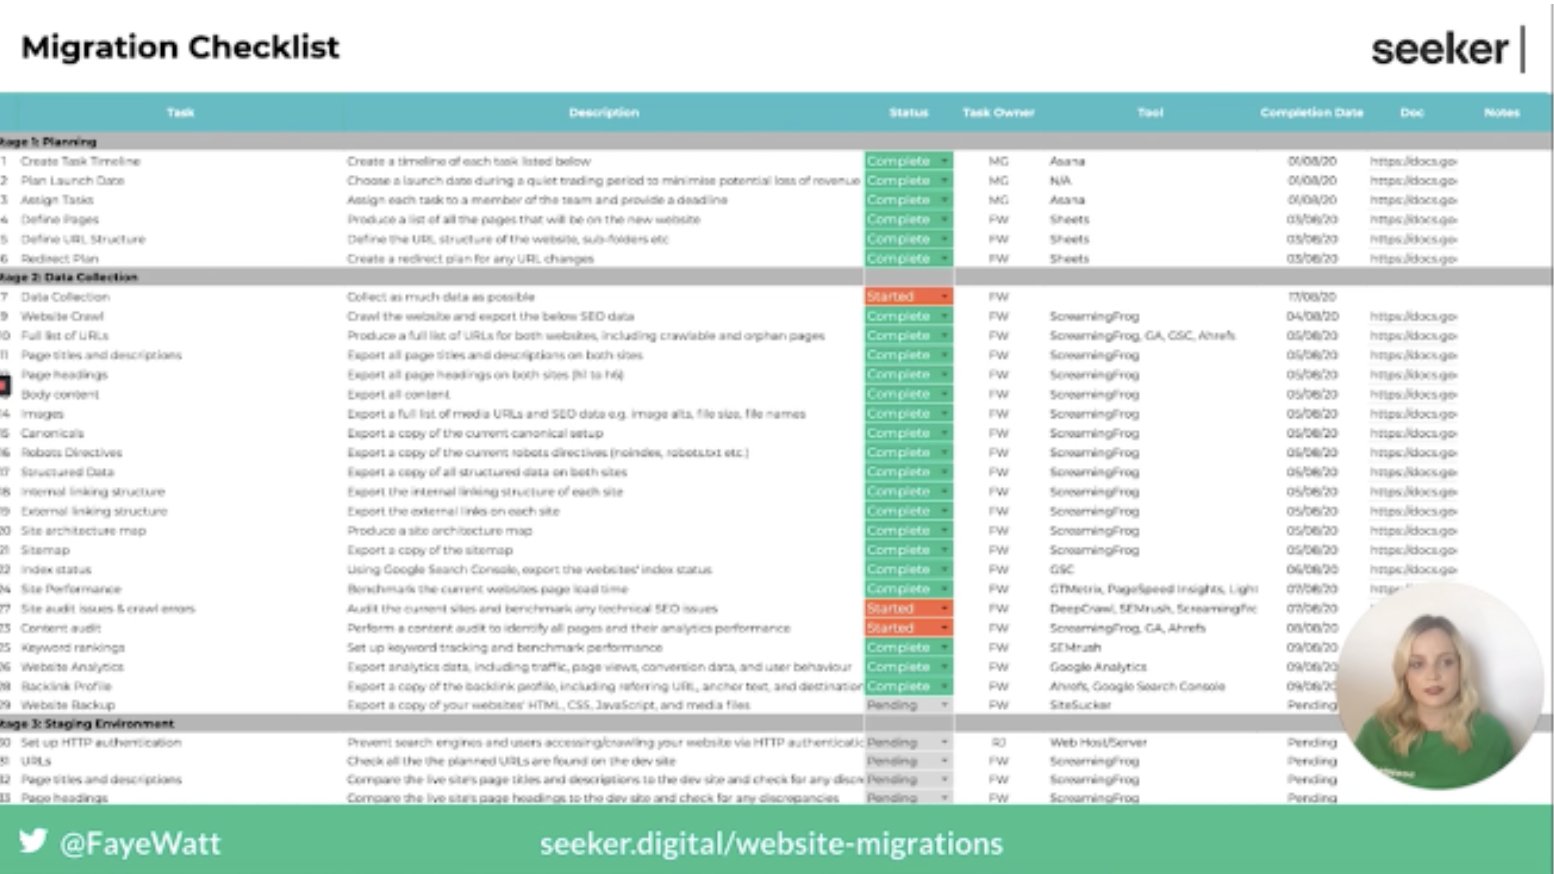
Next is to create a migration timeline, this will include all of the tasks that are needed to complete the migration. You will also need to make sure you have allocated time to test during the pre-launch period and allow time to fix any issues that are found during this testing phase.
You also need to plan for any issues that are found post-migration, and make sure high priority issues are fixed on the day of launch.
The second part of the planning process is defining which pages will be kept and moved over to the new site. The best way to do this is to produce a list of all the URLs currently on the website, including crawlable and non-crawlable URLs. There are a number of tools you can use to do this, such as a website crawler, Google Search Console, and Google Analytics.
Once you have a list of all of these URLs, the next step is to perform a content audit to identify the high traffic and value pages that you will want to keep.
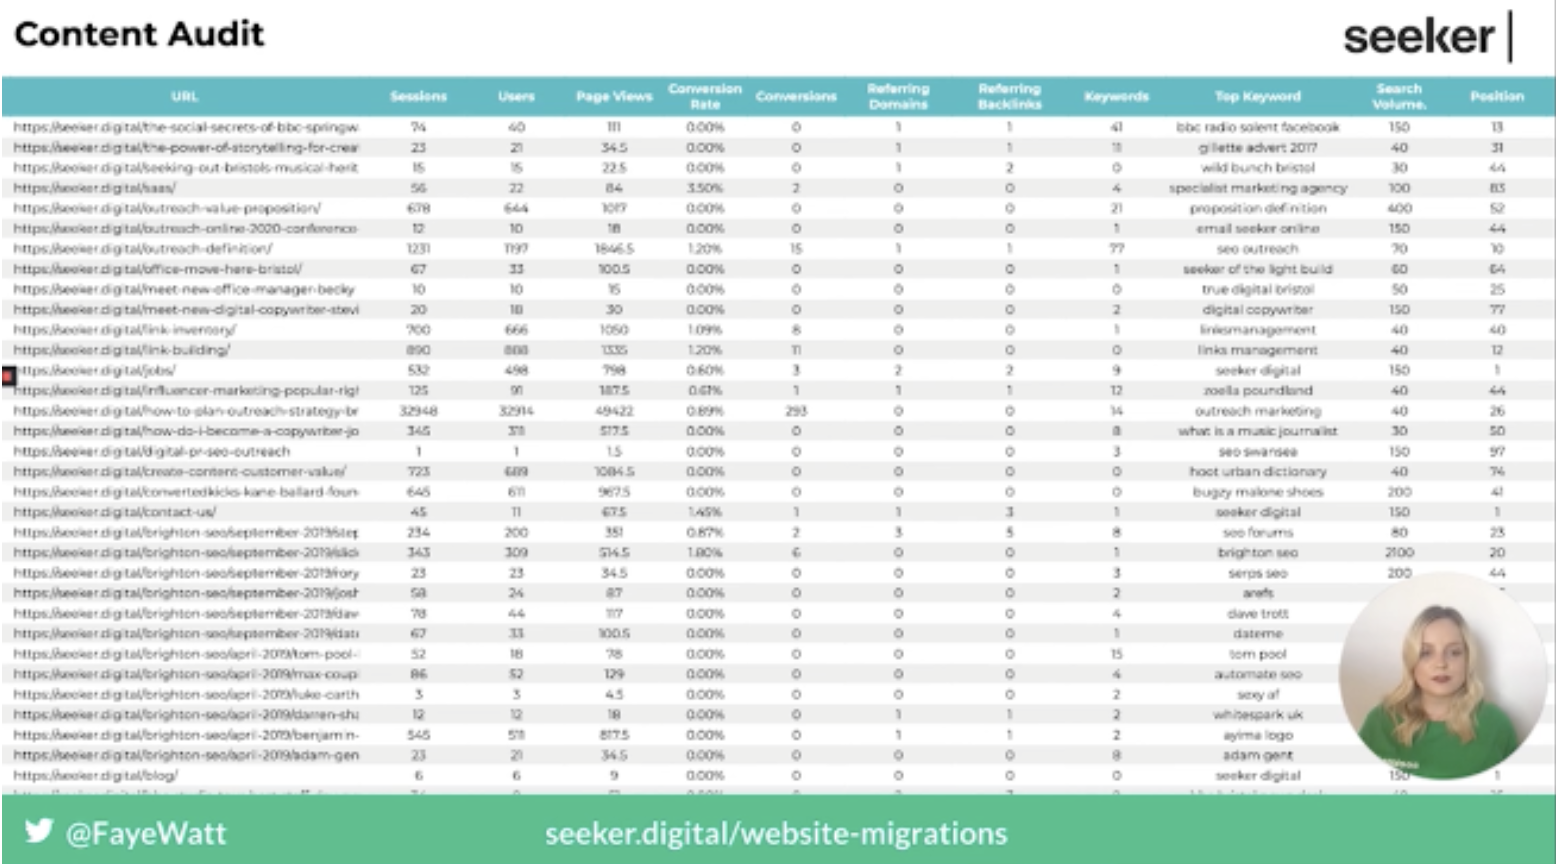
Then you can start planning the new URL structure and the folders that you will use. Following this, you may also need to perform some redirect mapping and create the necessary rules.
2. Data Collection
The second stage is data collection, where you will want to collect as much data as possible. You can do this by crawling your website and exporting all of the internal data such as page titles, metadata, canonical tags, etc. You will also need to save a copy of the website’s sitemap.
The second part of the data collection stage is to benchmark the current performance of the website in order to perform comparison testing following the migration. This includes the index status from GSC and website performance & load time from tools such as Google Page Speed Insights, Lighthouse, and GTMetrix.
In addition to this, run a site audit using a crawler to identify any issues and see if these can be fixed during the migration process, as well as to see if there is an increase in issues once the site goes live. You will also want to review your keyword ranking to ensure this isn’t affected following the migration.
3. Staging Environment
This stage involves setting up a staging environment and ensuring you have HTTP authentication set up to stop search engines and users from accessing the environment.
Once a website is ready to go live you will want to crawl the staging environment and compare it to the old website. During this comparison look for any missing, incorrect or broken data. You will also want to ensure all elements such as titles, descriptions, canonical tags, structured markup, internal links, etc. are the same.
During this stage, you will also want to ensure there is a custom 404 page set up and that any broken links return a 404 status code rather than a 200.
Once you’re happy all of the required pages are on the staging site, the next step is to create a sitemap to include all of the valid URLs and perform a site audit to identify any crawl errors and fix these prior to the launch.
Within this stage, you will also want to be continually monitoring and testing the site for any new issues while changes are being made.
4. Launch Day
When launch day arrives you will want to ensure your Search Console is set up properly and let Google know through this if you have updated your domain, using the change of address tool.
Check your Google Analytics is set up, recording sessions, and that goals are properly set up. In addition, double-check your robots.txt file to make sure search engines are able to crawl the site.
Make sure the site can be indexed and isn’t containing any noindex directives on important pages. In addition, you will need to check legacy URLs are correctly redirecting and crawl the new site to compare it to the old one and look for any missing, incorrect or broken data.
5. Post Launch
In the weeks after the migration has taken place, you may want to reach out to your most valuable linking domains and ask them to update the link. In addition, you should also perform a full technical SEO audit to identify all issues that need to be fixed.
6. Monitor and Review
The final stage is to monitor and review your new website in the weeks and months following the migration;
- Monitor the number of indexed pages
- Check old URLs are being replaced with the new ones in search results
- Review backlink profile and identify lost links
- Monitor organic traffic and keyword rankings
- Check crawl stats in GSC
- Continually monitor and fix any crawl errors
- Keep control of your old domains
- Don’t forget about SSL
You can access Faye’s slides, as well as the migration timeline she shared on the Seeker Digital site.
How to Optimise TTFB – Roxana Stingu
Roxana is the head of SEO at Alamy, a stock photo site that has 210M images, a collection that grows by around 150K a day. Dealing with a website that is mostly comprised of images comes with some unique challenges, with the main one being page speed.
In order to adhere to Google’s best practices, such as placing images above the fold and ensuring each photo is high quality, there isn’t much opportunity for keeping pages fast. For example, in order to include the image above the fold lazy loading is not possible, and for images to be high quality there isn’t much room for compression.
This means that it is harder to satisfy the new Core Web Vitals that Google has introduced, in particular the Largest Contentful Paint values.
Analysing page speed
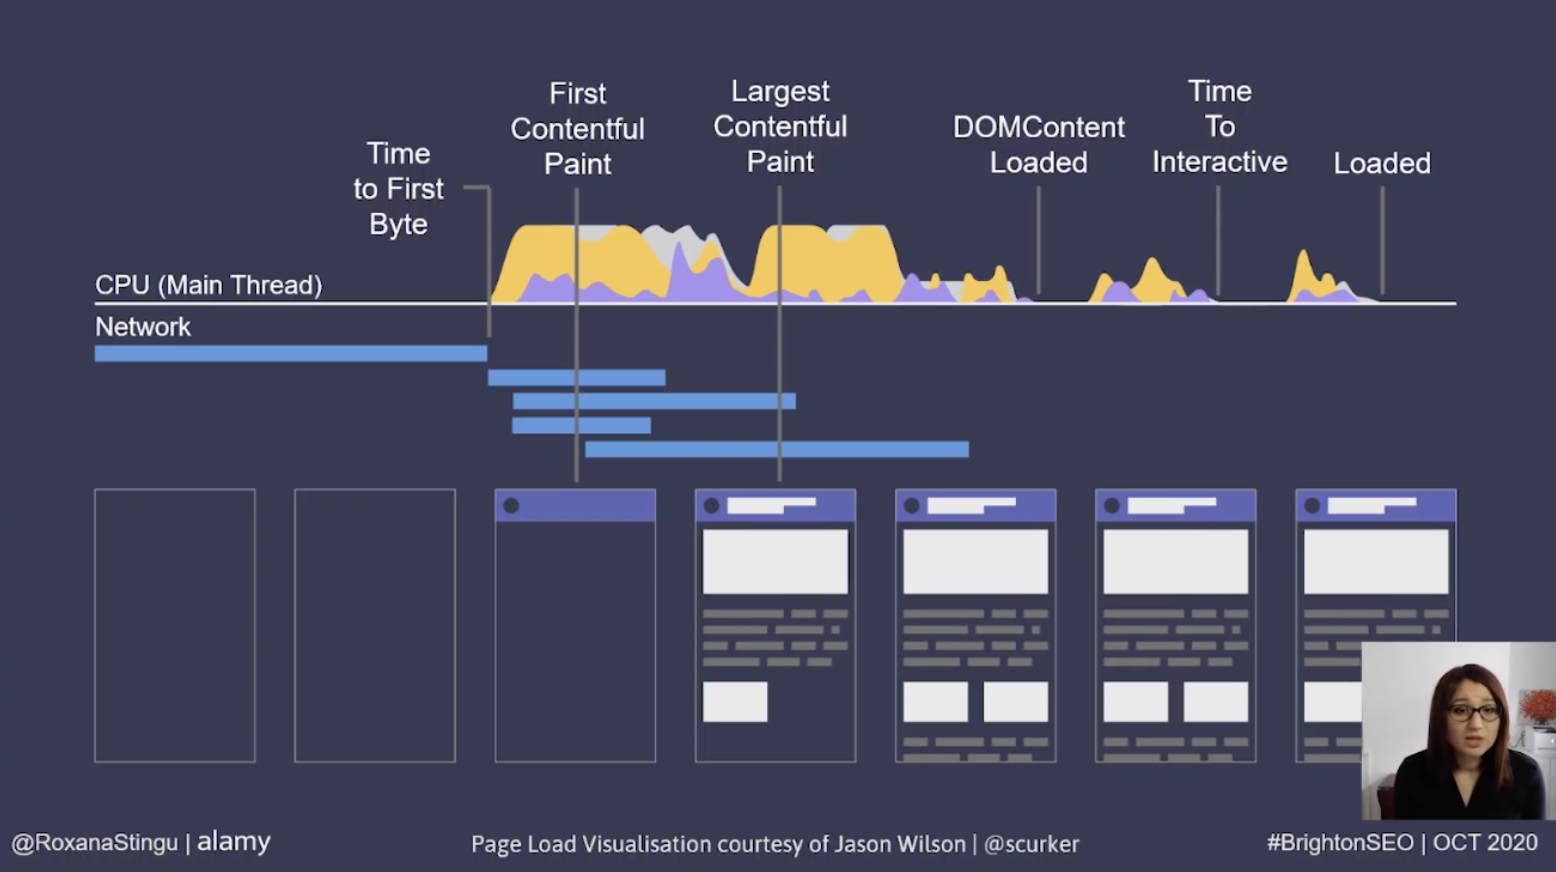
When reviewing a page’s speed, Roxana recommends reviewing the whole journey of a page load. This starts with a request to the browser, followed by some network activity in order for the server to find the response to send back to the browser. Once the response has made it back to the browser, there are different parsing, rendering, and building activities until the page becomes interactive for users.
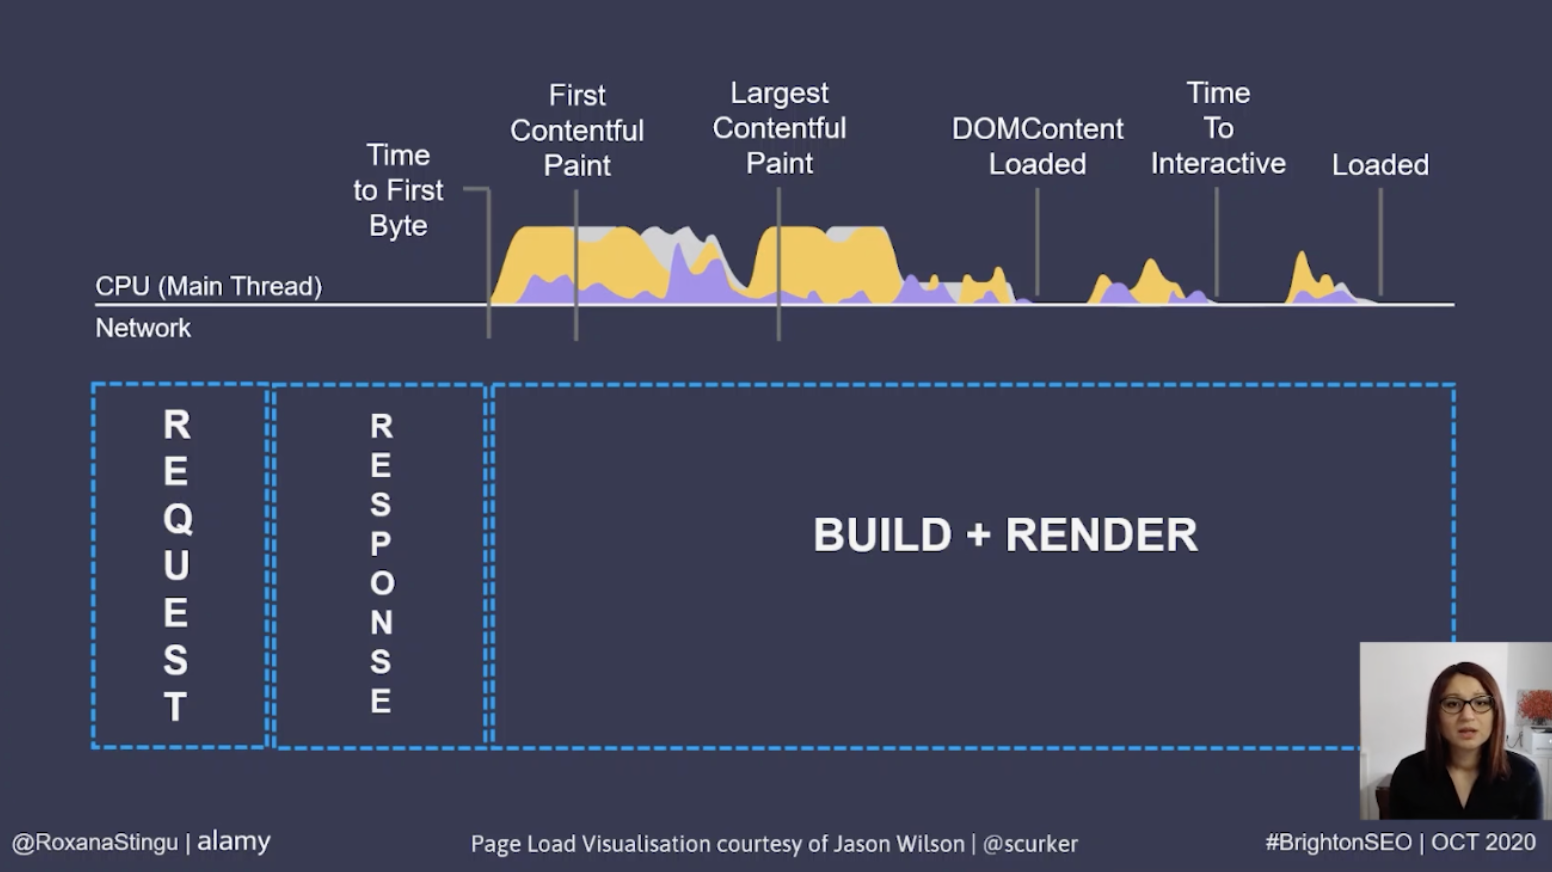
The largest contentful paint happens during the render phase of a page loading, so if it is not possible to optimize this, we need to look at the previous steps and find opportunities for improvement there.
As we don’t control the request, the only step we are left with is the response phase, therefore a good option is to optimize the time it takes following the initial request before the first byte of the response is sent back. This is known as Time To First Byte (TTFB).
Time To First Byte
TTFB is the time it takes since the request was made until the first byte of information is sent back to the browser.
How to measure TTFB
There are plenty of tools to check this value for any website, the first is using browser developer tools, such as Chrome Developer Tools. Using this as an example, Roxana explains that in order to do this we need to go to the network tab, identify the main document, click on it and inspect the timing tab to identify how long it takes for each step to execute, including TTFB.
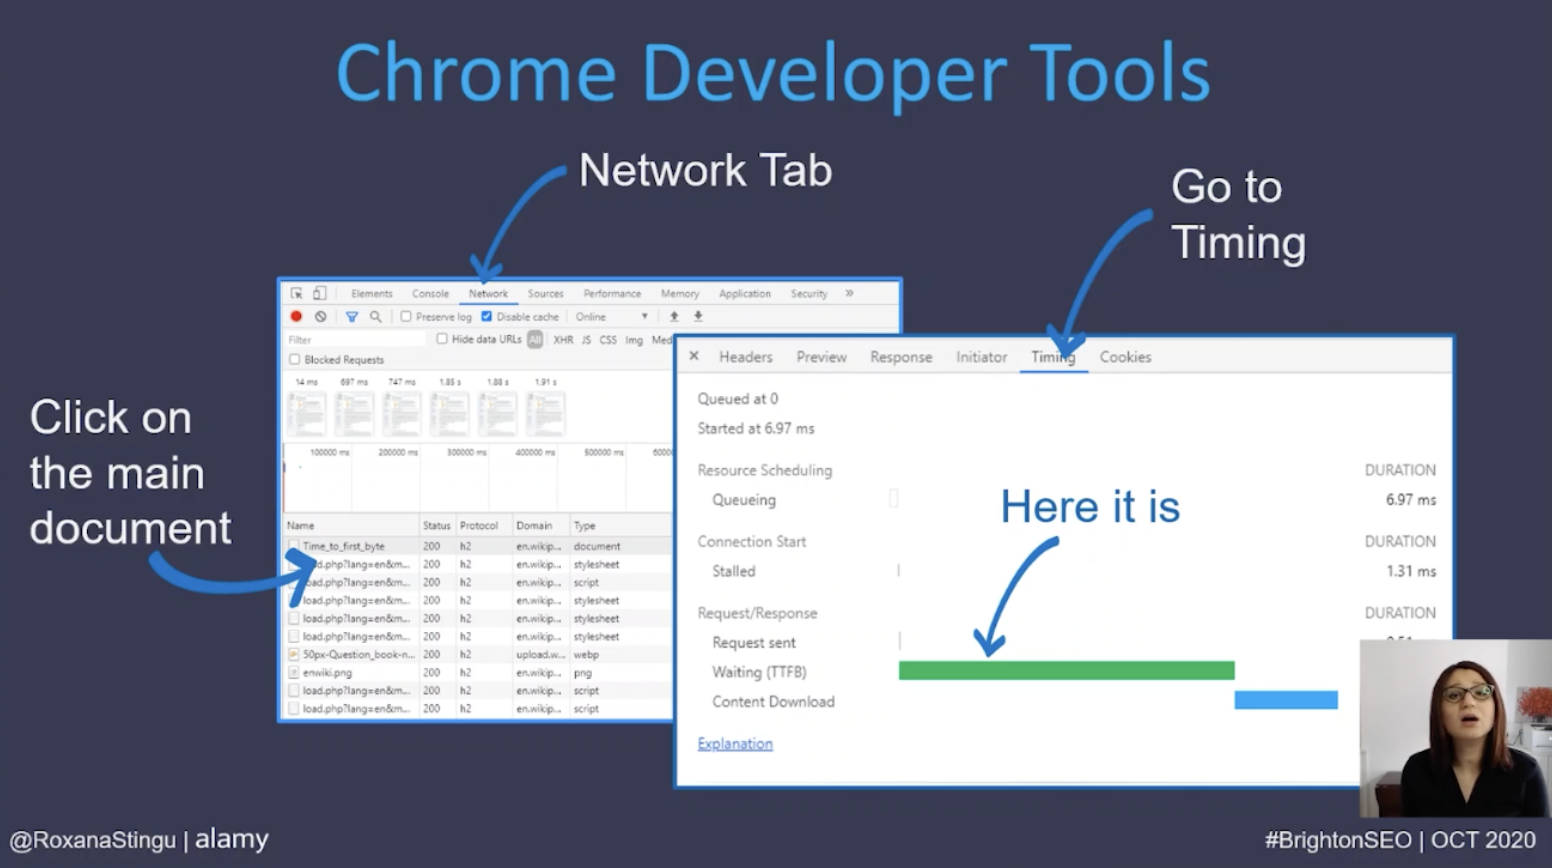
There is also the option to use additional tools such as webpagetest.org where the TTFB metric is represented as bright green within the waterfall view. Google Analytics also displays TTFB data under the server response time metric. This represents the amount of time a server takes to respond to a user request in seconds.
What is a good TTFB time?
Lighthouse documentation mentions that the ‘Reduce server response times’ warning for TTFB will be triggered if the response takes over 600ms. However, looking at real-world examples, TTFB has very different values across many websites, with an average value of 2.6 seconds on mobile and 1.3 seconds on desktop seen in a study of 5 million websites.
Network speed also plays a role in the TTFB of a site, so each website will have slightly different timings. Therefore, Roxana recommends investigating anything which looks out of the ordinary, rather than trying to achieve a specific TTFB value.
What is TTFB made up of?
Reviewing the timing tab found within browser developer tools helps to identify the elements which make up the TTFB value.
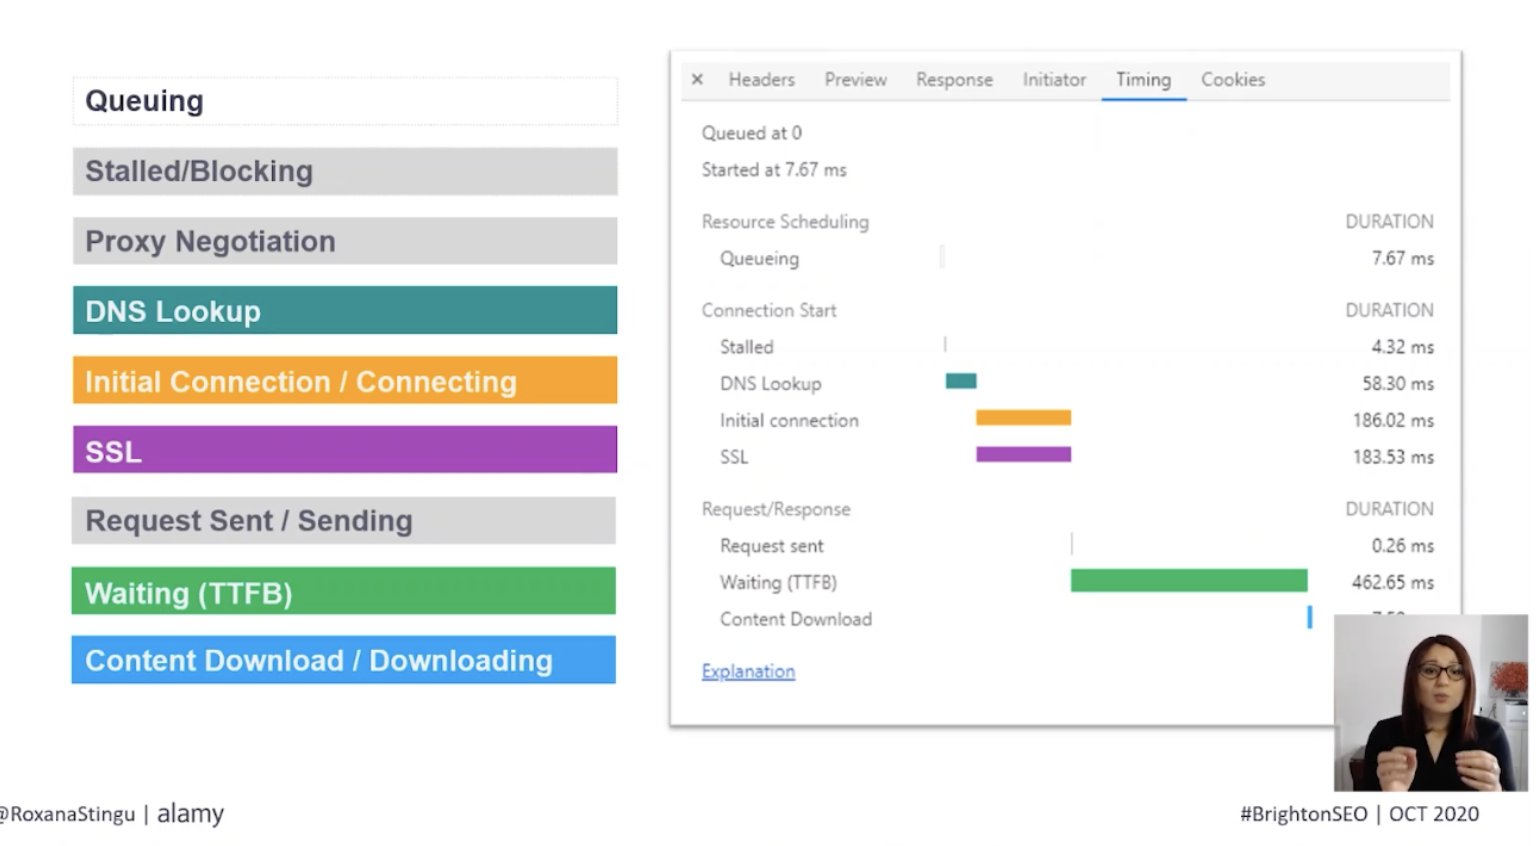
This displays the various steps that take place once a request has been sent, Roxana recommends analyzing each of these to see if any have abnormally high values.
Opportunities for improving TTFB
As soon as a request is made, it may be added to a queue, which indicates that the request was delayed because it is considered a lower priority than other more critical resources on a page. Another timing which may be reflected here is for the TCP connection to be opened up, which occurs in the case of requests being sent over HTTP/1.
If this is occurring for the loading of pages, the main course of action is to switch the server to use the HTTP/2 protocol instead. This will allow all resources from one given domain to load simultaneously instead of loading in batches. However, in order to use HTTP/2, the browser must also be compatible. Although there is 95% global usage of HTTP/2 already, Roxana recommends reviewing how many users this will impact for a specific website by visiting https://caniuse.com/ and connecting your analytics to see how much of your traffic will benefit from browser-related features such as HTTP/2.
DNS lookup
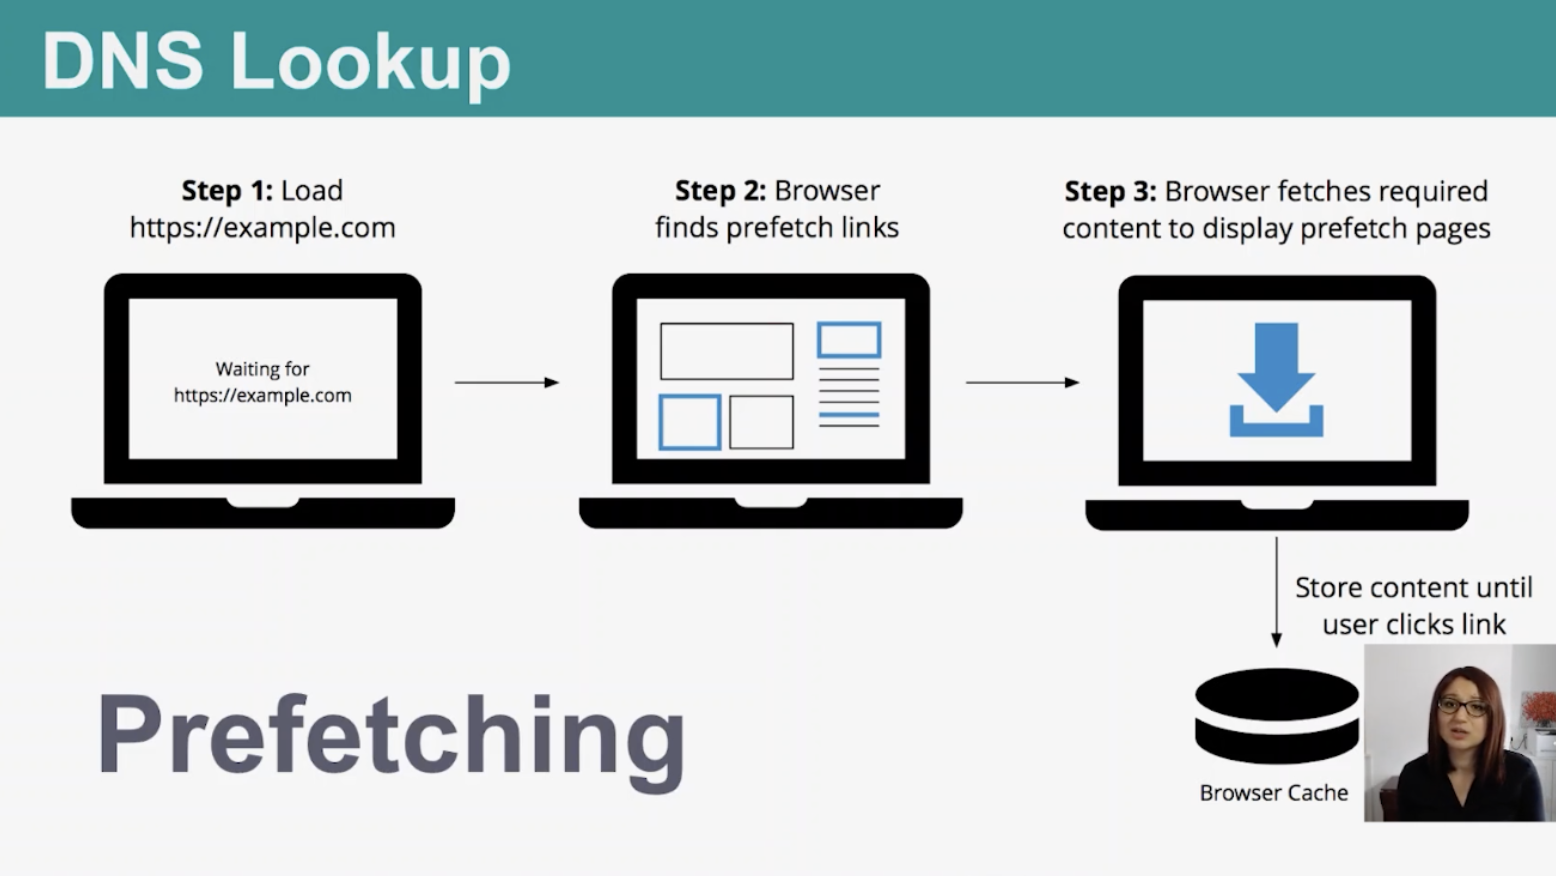
The next step in the page loading process is the DNS lookup, every new domain and subdomain on a page requires a full round trip for the lookup. This should take on average between 20 – 120ms and anything above this may present an optimization opportunity. One recommendation for this is to find a fast DNS provider to speed up the process.
Another option is to use pre-fetching, which retrieves the required data and caches it in the browser until a user clicks the link.
Initial connection
Following the DNS lookup step is the initial connection, this is the time taken to perform the initial TCP handshake and negotiate the SSL. The delay here is often due to the server hitting a limit meaning it is unable to respond to new connections while existing ones are still pending.
It could also be due to a faulty SSL certificate, and Roxana recommends testing for this if your initial connection speed is poor. In order to perform a test, go to https://www.ssllabs.com/ssltest/ and input your hostname. This will display a report with all the SSL’s found on the domain. Most of the web uses TLS 1.2 for SSL connections, which is a protocol that includes back and forth communications between the client and server. This process can take on average 250 – 500ms to complete, and nothing can happen while this is running.
Request sent
The next step in the page loading process is where the request is sent, and should only take around 1 ms. If this is not the case, Roxana recommends reviewing the connection or payload size of the page. If the affected pages requiring optimization are image files, you can use formats, such as Webp, to reduce the page load size.
In addition, caching is useful for optimizing this step, as it avoids the need to re-download the same resources for repeat visitors. If the affected files are JS or CSS, look to minify them to reduce the payload size.
Dynamic content
One of the most common reasons for high TTFB is due to the use of dynamic content. This means that every time a page is requested, the server has to put it together before sending it back as a response to the user. Comparatively, if the server is using static content instead, it would only need to put the page together the first time it is requested. For any subsequent requests, it would have a copy of the already compiled page on hand to return to the browser. However, static content isn’t a solution for everyone, especially if content is changing often.
Redirects
Lastly, every redirect step that is encountered adds more time to the TTFB of a page load. This can easily be avoided by making sure that all internal links point to 200 status code pages, rather than redirecting. In addition, ensuring there are no redirect chains on a site will also help optimize TTFB.
What SEOs Need To Know About The New Bing Webmaster Tools – Fabrice Canel
Bing is a search engine programmed by AI, Machine Learning, and serves content and aims to provide searchers with timely, relevant results that they can trust. Fabrice, Principal Program Manager at Bing, explained the search engine is larger than we think, it’s not just bing.com, it’s also a search solution powering a number of other search engines such as DuckDuckGo and Ecosia.
Fabrice’s mission at Bing is to build the world’s freshest, richest, cleanest, most comprehensive, and most intelligent model of the web.
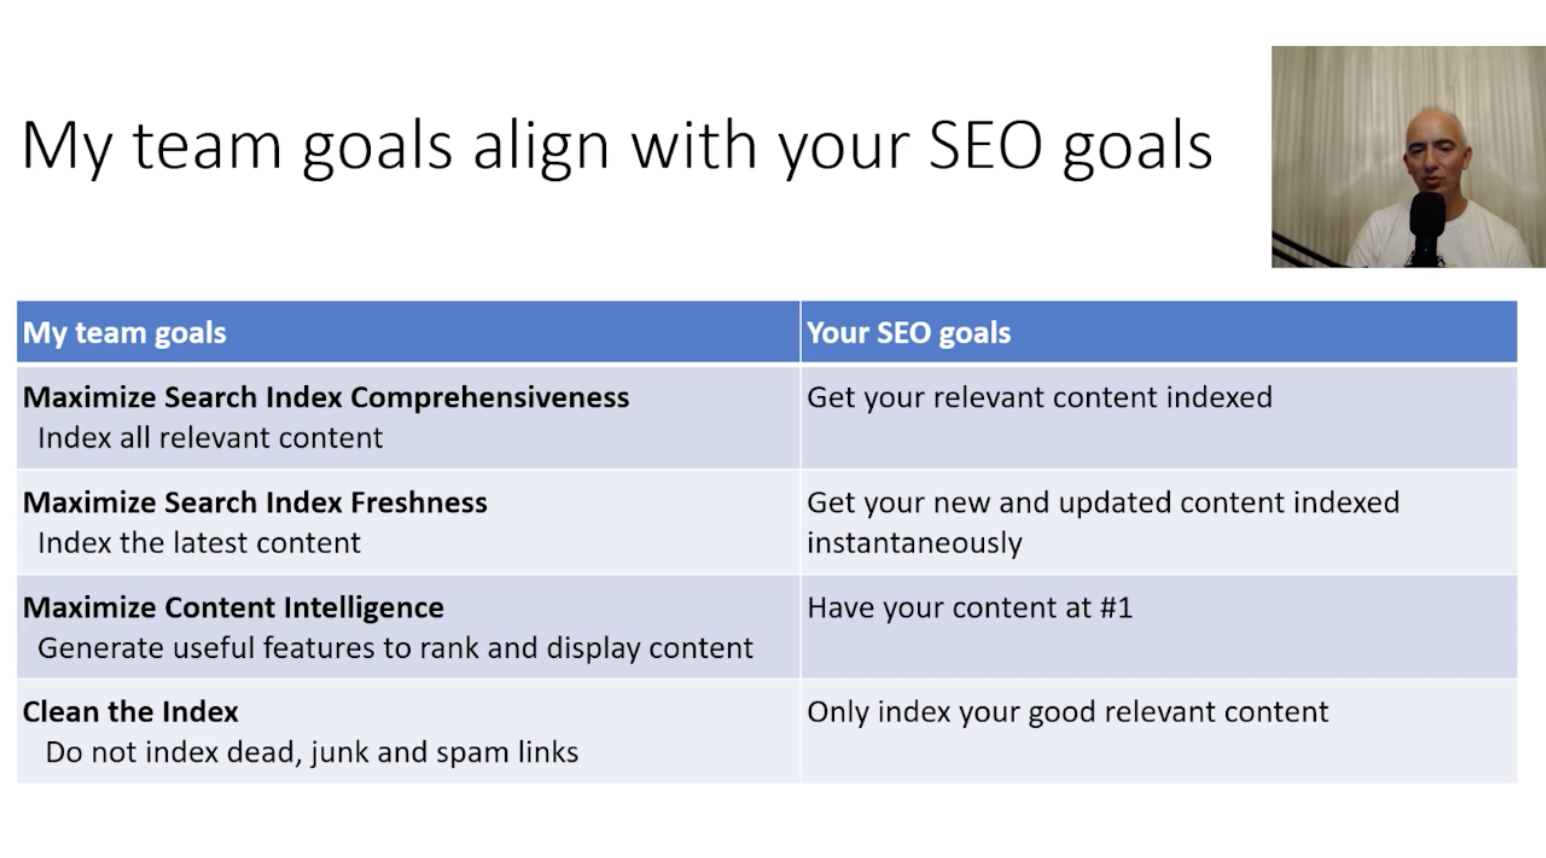
Bing recently announced the updated version of their Webmaster Tools which was built to be faster, cleaner, more actionable, and responsive. The user interface has had a complete redesign in order to make it easier for users to navigate and find information. Fabrice explored the new reports which can be found on the platform.
New search performance report
This report displays information regarding a website’s performance on Bing search. This includes integrated page traffic and keyword reports meaning we are able to identify and analyze which pages are getting the most clicks and top-performing keywords. For example, find out which pages are performing well and which ones need to be optimized further.
There is also the ability to track daily traffic on a website for the last 6 months, using an interactive chart, as well as analyze performance based on positions on which the result appeared in Bing search.
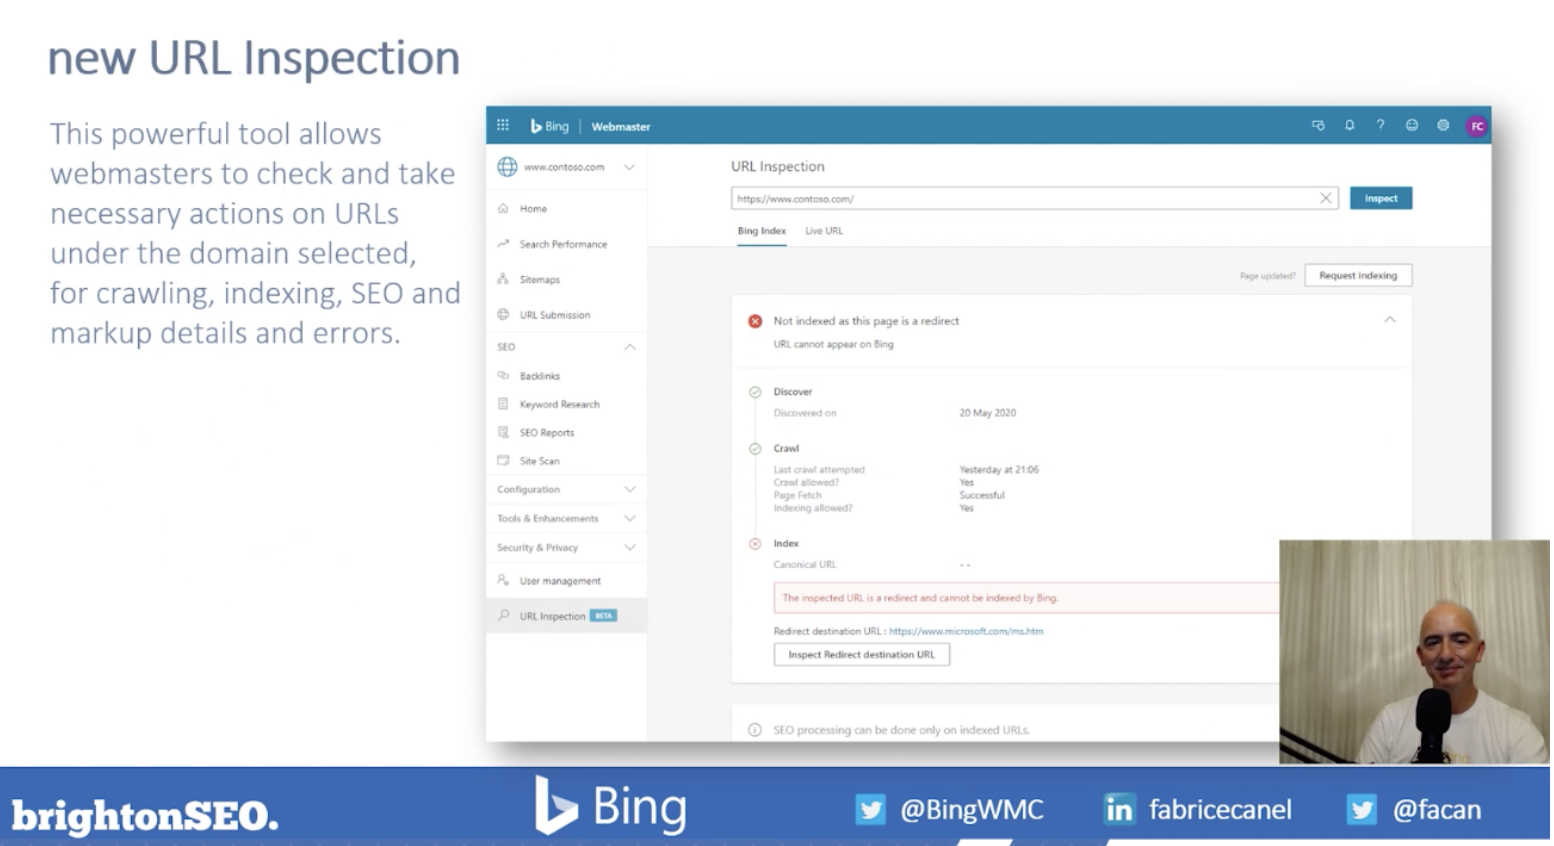
New URL inspection tool
This tool allows webmasters to check crawling, indexing, and markup details for each URL under the domain selected. It will also identify if there are any errors on a certain URL and why the issues are occurring, in order to inform users of the necessary actions they can take for improvement.
New backlinks tool
This report integrates the inbound links report and disavow links tool available in the Bing Webmaster Tool in order to analyze the backlink profile of any website. This means that you can not only review backlinks pointing to your domain but also compare it to your competitors.
It enables you to view backlinks pivoted by either the referring domain or anchor text and is intelligently designed in order to display a representative set of links. The tool is able to display 100k links within the platform, with the ability to export 250k.
URL submission
Fabrice described this tool as a ‘game-changer’ as it is not something other search engines are currently doing, at this level. The URL submission tools allow the ability to submit URLs to Bing in order to instantly index the content within Bing search results.
URL submission API
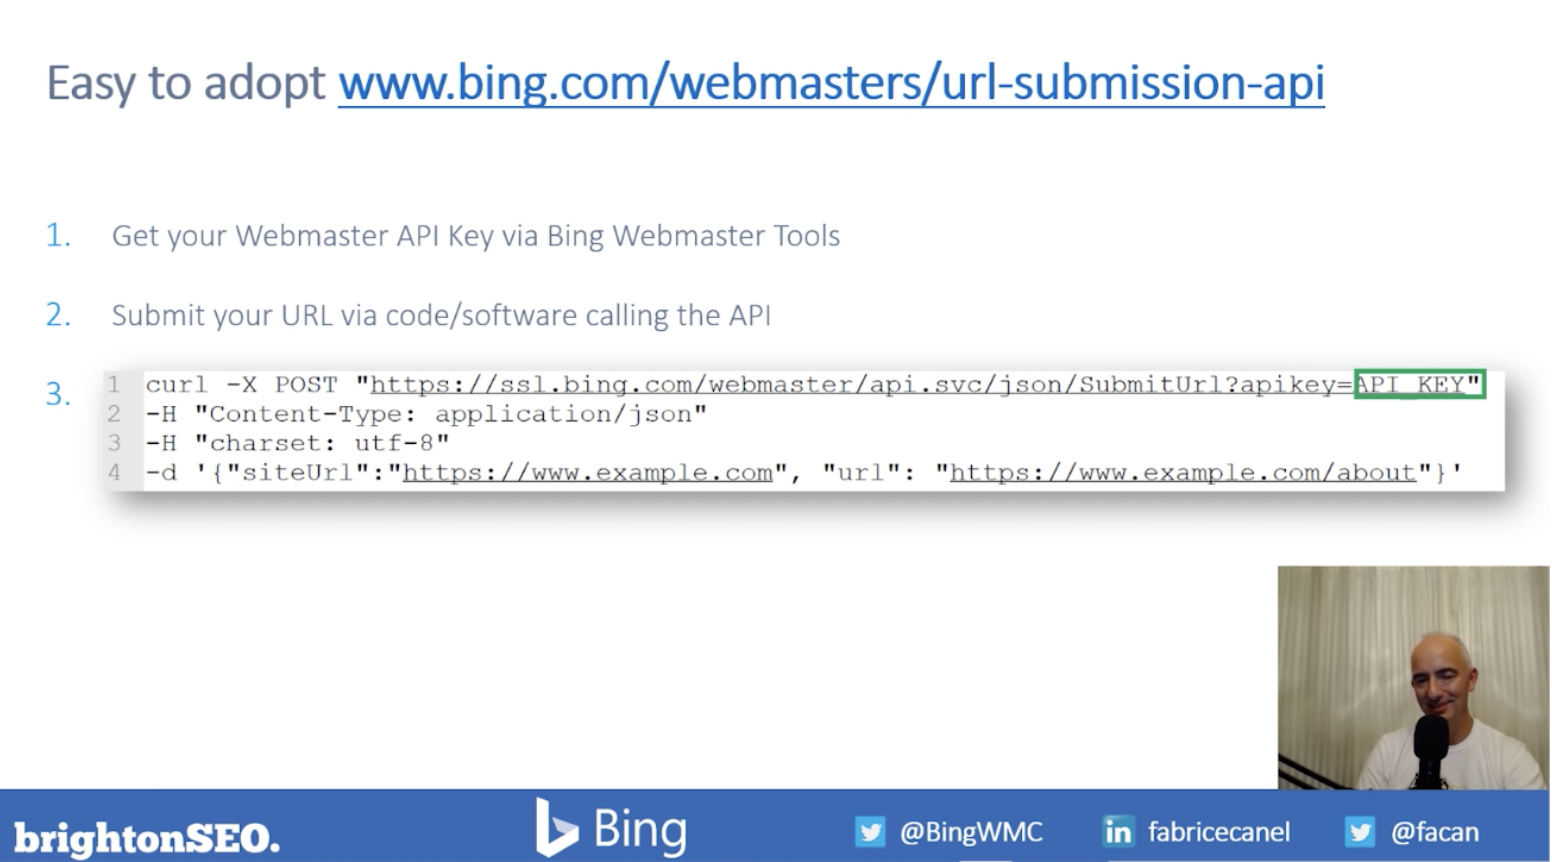
There is also the ability to automate URL submission using this tool, using the URL submission API.
This is completed in 3 steps;
- Submit the URL to Bing for indexing through the API
- Bingbot will then be sent to fetch the page
- It will then return the HTML back to the Bing web data store for indexing in less than 1 minute
Bing also made the URL submission API easy to adopt, it simply requires a piece of code that includes the URL you would like to submit, and the API key which can be found within the webmaster tools platform.
There is also a WordPress plugin for the Bing URL submission tool, which allows WordPress users to submit URLs to Bing automatically when new content is published.
New sitemaps report
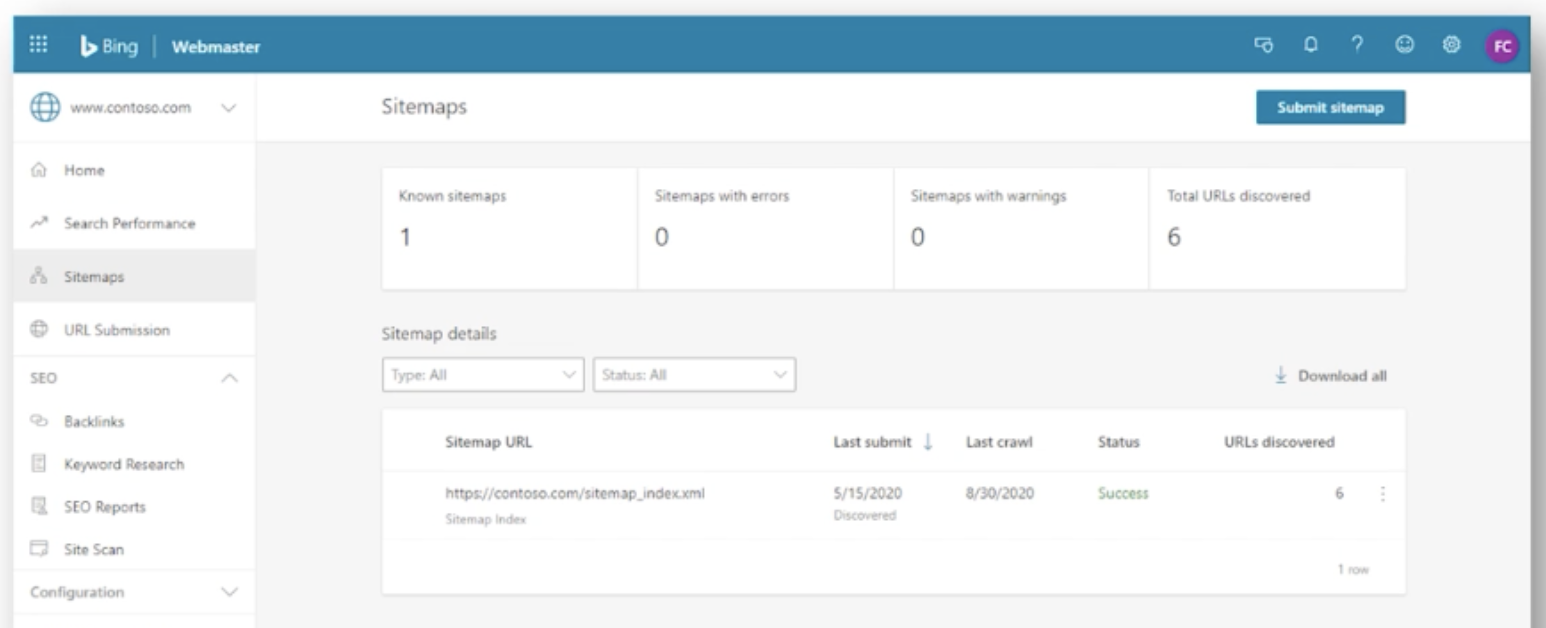
The next report Fabrice shared is the sitemaps report, which displays all sitemaps known to Bing for any given site. The purpose of this is to provide webmasters with the opportunity to clean up stale sitemaps, as well as remove unwanted sitemaps from Bing.
The tool also allows for the instant processing of sitemaps to discover URLs, as well as the ability to view, analyze and export sitemaps, sitemap index and feeds separately. The next update coming for this report is to perform sitemap diagnostics.
New search keywords report
This tool helps SEOs understand the type of content we should be creating, or optimizing. The report displays which keywords from organic search are driving impressions and clicks to content on the website. There is also the ability to filter by country, language, and devices for all search terms.
New SEO reports
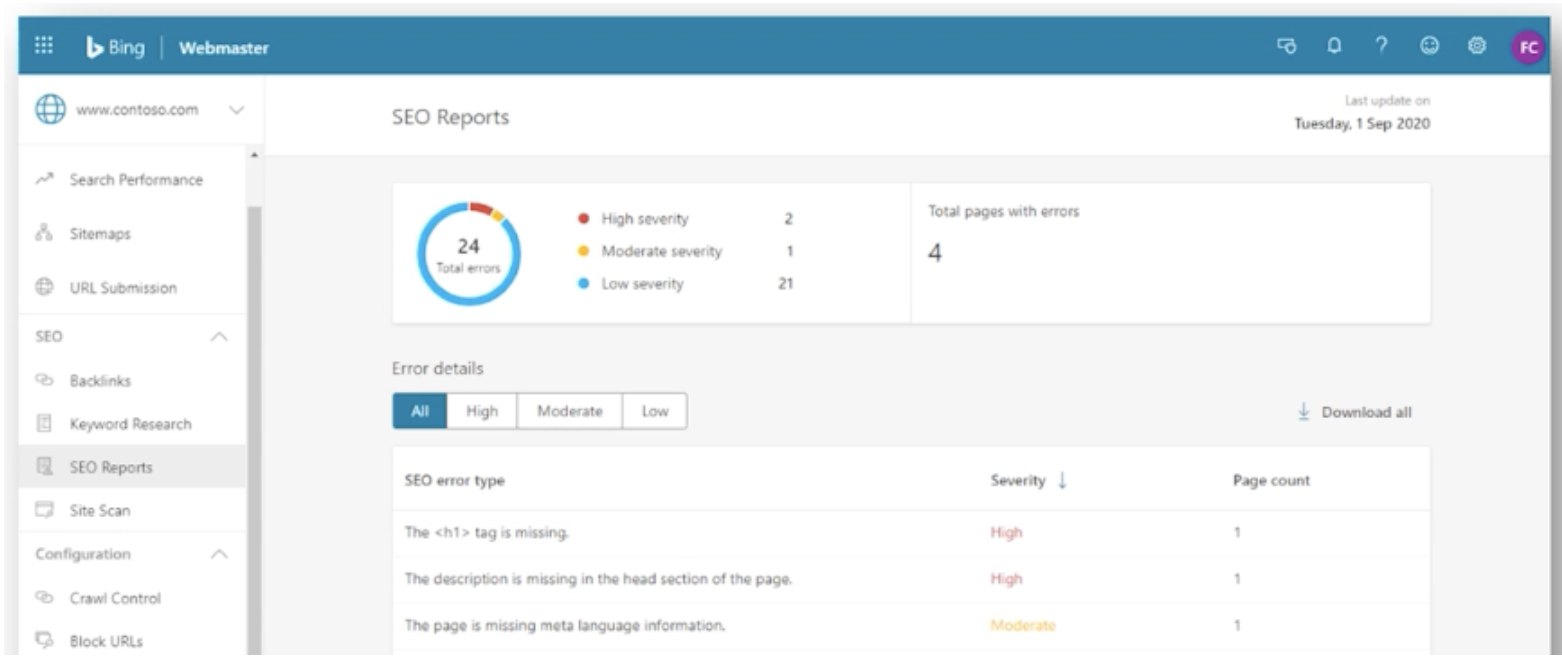
The SEO reporting available within Bing Webmaster Tools is based on a set of 15 SEO best practices and provides errors and recommendations at a page-level.
New robots.txt tester
This testing tool enables users to analyze a website’s robots.txt file and highlights issues that would prevent pages from getting crawled by Bing, or any other search engine.
New Webmaster Guidelines
In addition to the updates to the Webmaster Tools, the team at Bing also updated their webmaster guidelines in order to help users understand a number of things, including;
- How Bing find and indexes websites
- How to help Bing find all pages
- How to help Bing understand website content
- How Bing ranks content
- How to avoid abusing the platform and examples of things to avoid
Automating Optimisation For Featured Snippets in SERPs on a Large Scale – Polly Pospelova
Polly is the digital marketing director at UNRVLD (formerly called Delete Agency) and started her presentation by explaining that featured snippets are brief answers to a user’s search query, which are displayed on top of the Google search results. Most of the time this information is extracted from one of the top-ranking pages for that search query.
Featured snippet types
There are several different types of featured snippets, including;
- Paragraphs
- Lists
- Tables
- Videos
What do we know about featured snippets?
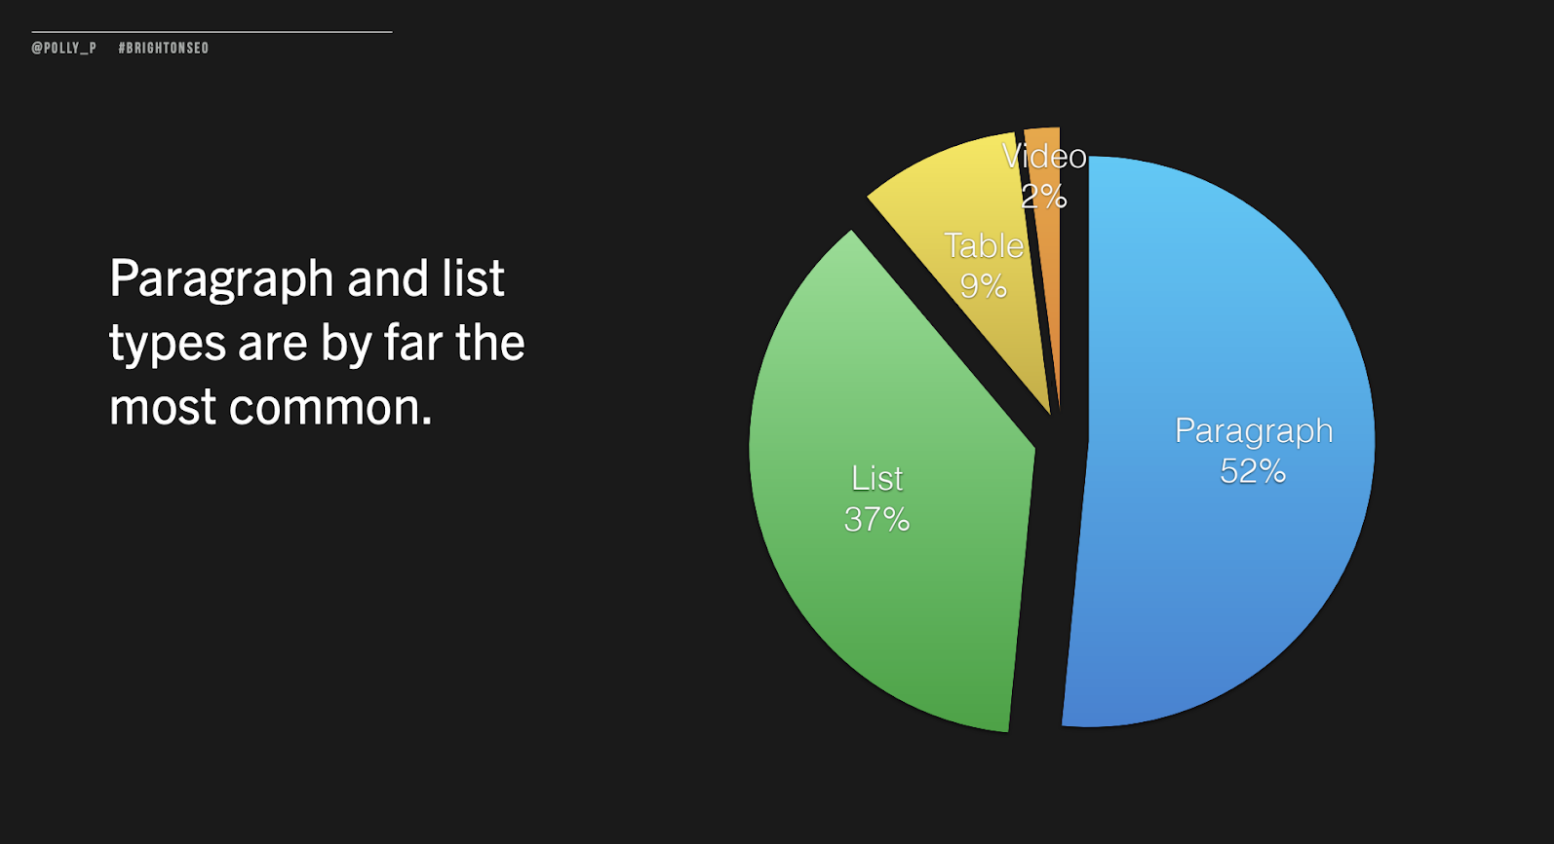
The first thing Polly explained is that paragraph and list type featured snippets are the most common types found within search results. The paragraph type makes up more than half of all featured snippets, with around 37% being the list type.
According to research undertaken by Ahrefs and Moz, between 12% – 24% of all search queries contain a featured snippet within the results.
Do featured snippets drive more clicks?
Featured snippets are styled differently to the rest of the search results page. They occupy more real estate on SERPs and clearly catch the eye of users due to their prominent position.
Research from Ahrefs shows that 26% of clicks go to the first URL within SERPs when no featured snippet is present. However, when a featured snippet is present 19.6% of clicks go to the first URL, with 8.6% of clicks going to the featured snippet.
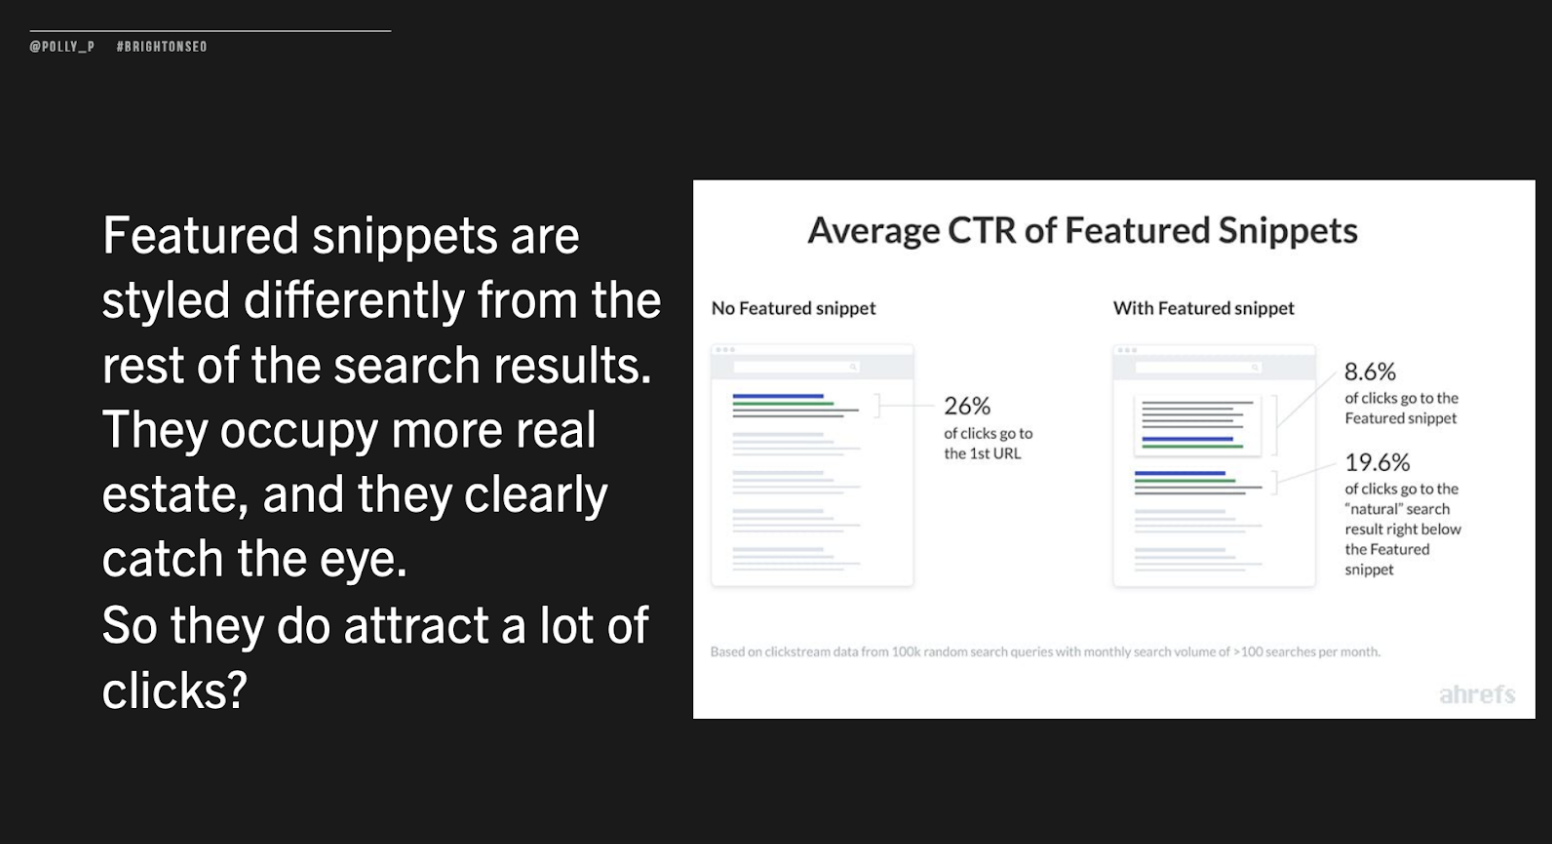
Therefore, Polly explained that the true value of featured snippets is in enhanced brand awareness and controlling the messaging in SERPs, as well as the possibility of inclusion in voice search results.
How to optimise for featured snippets
The first step is to look for a search results page that already has a featured snippet, as this shows that Google wants to show a featured snippet for that term. You will also be able to see which type of snippet is being shown for that search, e.g a paragraph or a list. This makes optimizing a page for the same featured snippet a lot simpler.
The next step is to review the page that is receiving the featured snippet in order to understand how they are structuring their page and the kind of information they are including. These steps will provide data on what type of featured snippet to optimize for and how to go about structuring the content and markup.
The next step is to optimize the page, this includes several different steps;
- Lay out the page so that the specific steps or list items are presented in a way that Google can easily understand
- If the featured snippet you are optimizing for is a list type, make sure each item or step is wrapped in a list tag
- If lists are long, wrap the shorter text you want to show up in the featured snippet within a strong (bold) tag
Demonstrating tangible organisational impact
Organizational impact can only really come from optimizing for featured snippets on a large scale and automating the process. But what does it take to optimize for featured snippets on a large scale? Polly used a real-world example from a recent client she worked with to answer this question.
The first step Polly and her team undertook was to understand how the client manages content on their website, what challenges and pain points they face as well as their complex content structure.
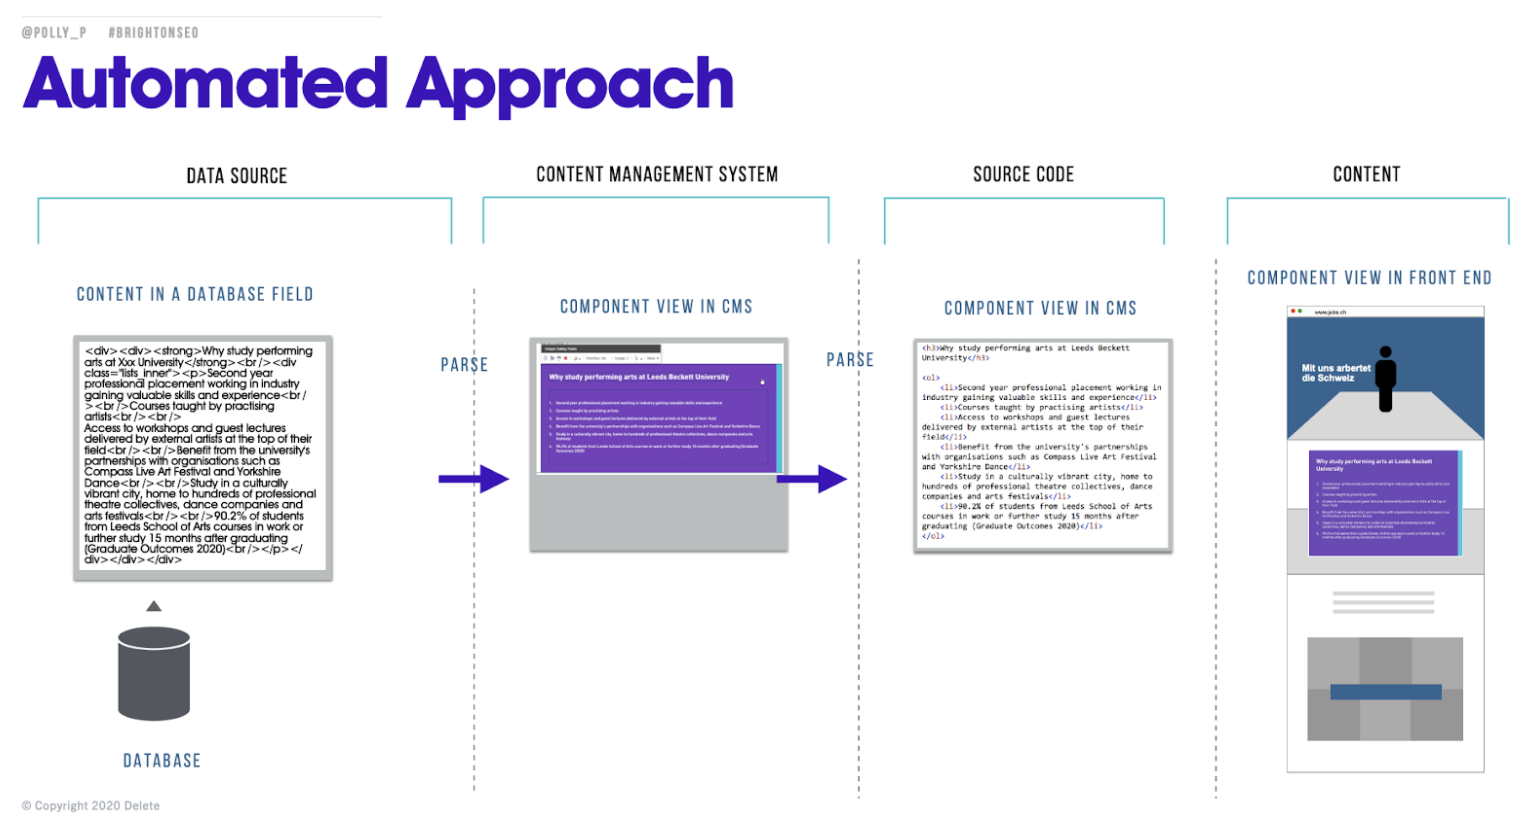
They found out that historically their client had no control over the HTML content structure behind certain content types, for example creating an ordered list. We know these are important for list style featured snippets and that Google is going to look for them. Therefore, they needed to work with the development team to make sure that the markup behind those components is automatically semantic. This meant that content editors were able to continue to add content in the same way and they didn’t need to learn a new process, but the clean markup needed for featured snippets was still generated in the source code.
Polly explained how they applied this same approach to their entire website component library in order to empower the content editors to continue to create the same content while ensuring the semantic benefits would be seen by Google.
Updating legacy content for featured snippets
The next step was to go about ensuring their legacy content, which was formatted poorly, was able to be updated to the correct set-up. This is where working with developers paid off for the team because they were easily able to write a script that converted the structure into the desired format.
Automated approach
All of these steps led to the orchestration of an automated process. From taking the content they already had on the site, converting it, and enabling editing on the CMS to still take place to ultimately achieving the necessary automated approach. This also helped to cut down on hours of resources and ensured there was no disruption to the client’s workflow.
Key Takeaways
- Research keyword group opportunities with high search volume
- Assess your situation and the resources available to you
- Leverage developers expertise in order to achieve mass impact
You can access Polly’s slide, and a full write up of her talk on Delete’s blog.
The BrightonSEO October 2020 Event Recaps continue…
Because there were so many great sessions to catch we couldn’t stop at just 2 recaps, check out part 3 for even more technical SEO learnings from Faisal Anderson, Hamlet Batista, and Niki Moiser.


