JIRA is one of the most widely used tools for managing development work. Once Lumar flags problems or opportunities with your website, users then need to manually create JIRA tickets for these items and send them through to the engineering team to fix or implement.
With the Lumar Zapier integration, you can use Zapier to automatically create JIRA tickets when problems are flagged in Lumar reports. In this guide we will walk you through how to set up a Zap to do just that.
How to Access Lumar’s Zapier Integration
As the Zapier integration is in beta it can only be accessed via a shared link, which can be found here:
https://zapier.com/developer/invite/82214/f0990868cb1f9f1aa9b5af9214cb9bcb/
Once you navigate to the shared link you will need to login to continue. If you do not already have a Zapier account you can Sign Up for a free account and begin using the integration straight away.
Setting up the Trigger
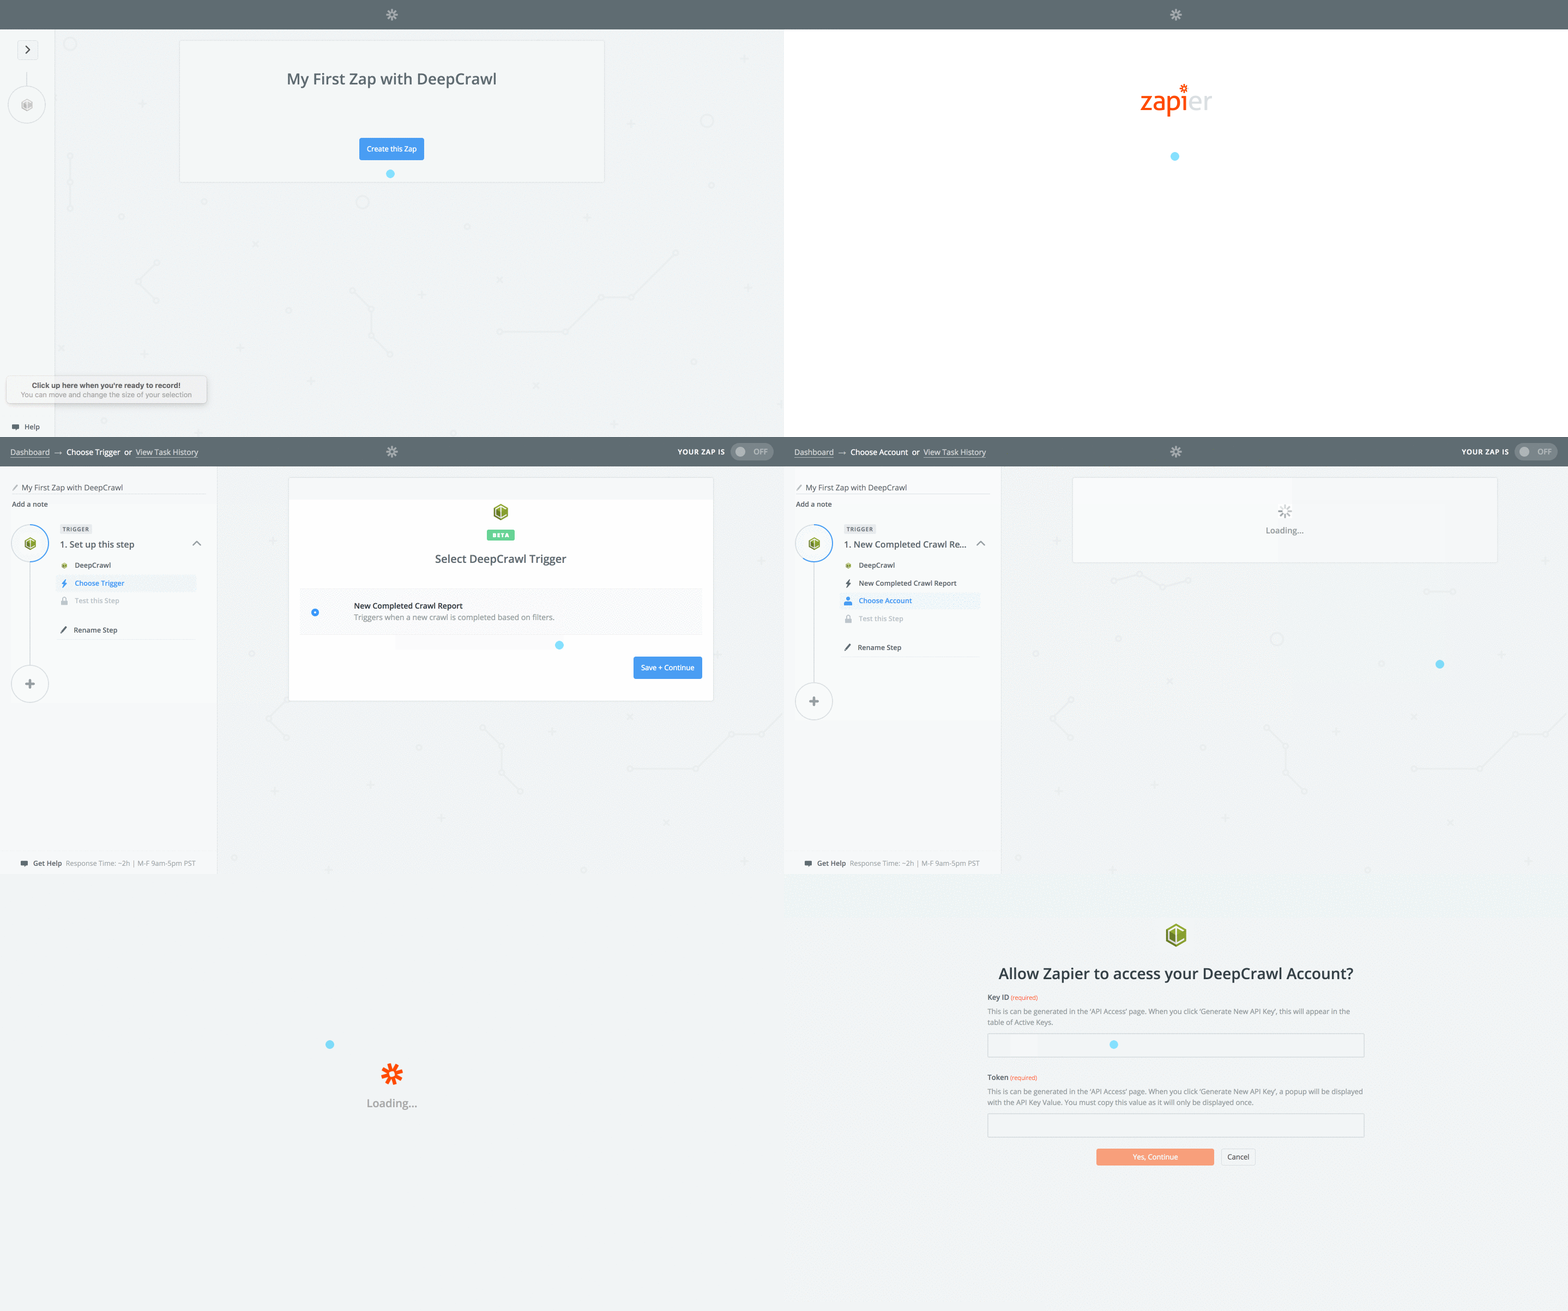
Once you’re logged into Zapier click ‘Create this Zap’ to begin. Now we will setup the ‘trigger’ that activates this rule. For this use case the trigger would be: ‘New Completed Crawl Report’, so ensure that that trigger is selected and click: ‘Save + Continue’.
You will then need to connect your Lumar account to Zapier by clicking ‘Connect an Account’. This will open a new window where you will need to input your Lumar API credentials which you will first need to generate.
Note: You will only need to do this once to setup your account, after that your account will always be available on this page and you simply have to select it and click ‘Continue’.
Connecting your Lumar Account
To generate your Lumar API credentials, navigate to the ‘API Access’ page in the Lumar app which can be found in the navigation menu by clicking on your account name in the top right of the page. Then, once you’re there, click on the ‘Generate New API Key’ button and a modal will appear with the token inside.
Copy the token and paste it into the ‘Token’ field in the Zapier window. Then go back to the ‘API Access’ page in Lumar app and look for the Key ID which can be found in the table. Copy the Key ID and paste it into the ‘Key ID’ field in the Zapier window and click ‘Yes, Continue’.
You’ll then be taken back to the Zapier interface where you will now see your account appear in the list. Select that account and click ‘Save + Continue’.
Setting the Options
Click the drop down list to select your Lumar account, then select the project you want to use in this zap from the project drop down list (you can search for a project if you find that easier).
Finally, select which Lumar reports you want to use in this Zap (you can select multiple reports using the plus button). In this example we will select Broken Pages (4xx Errors).
Now that you’ve set the options, click ‘Continue’. You will then be presented with a summary of your configuration. Click ‘Fetch + Continue’ to test that your configuration will work properly.
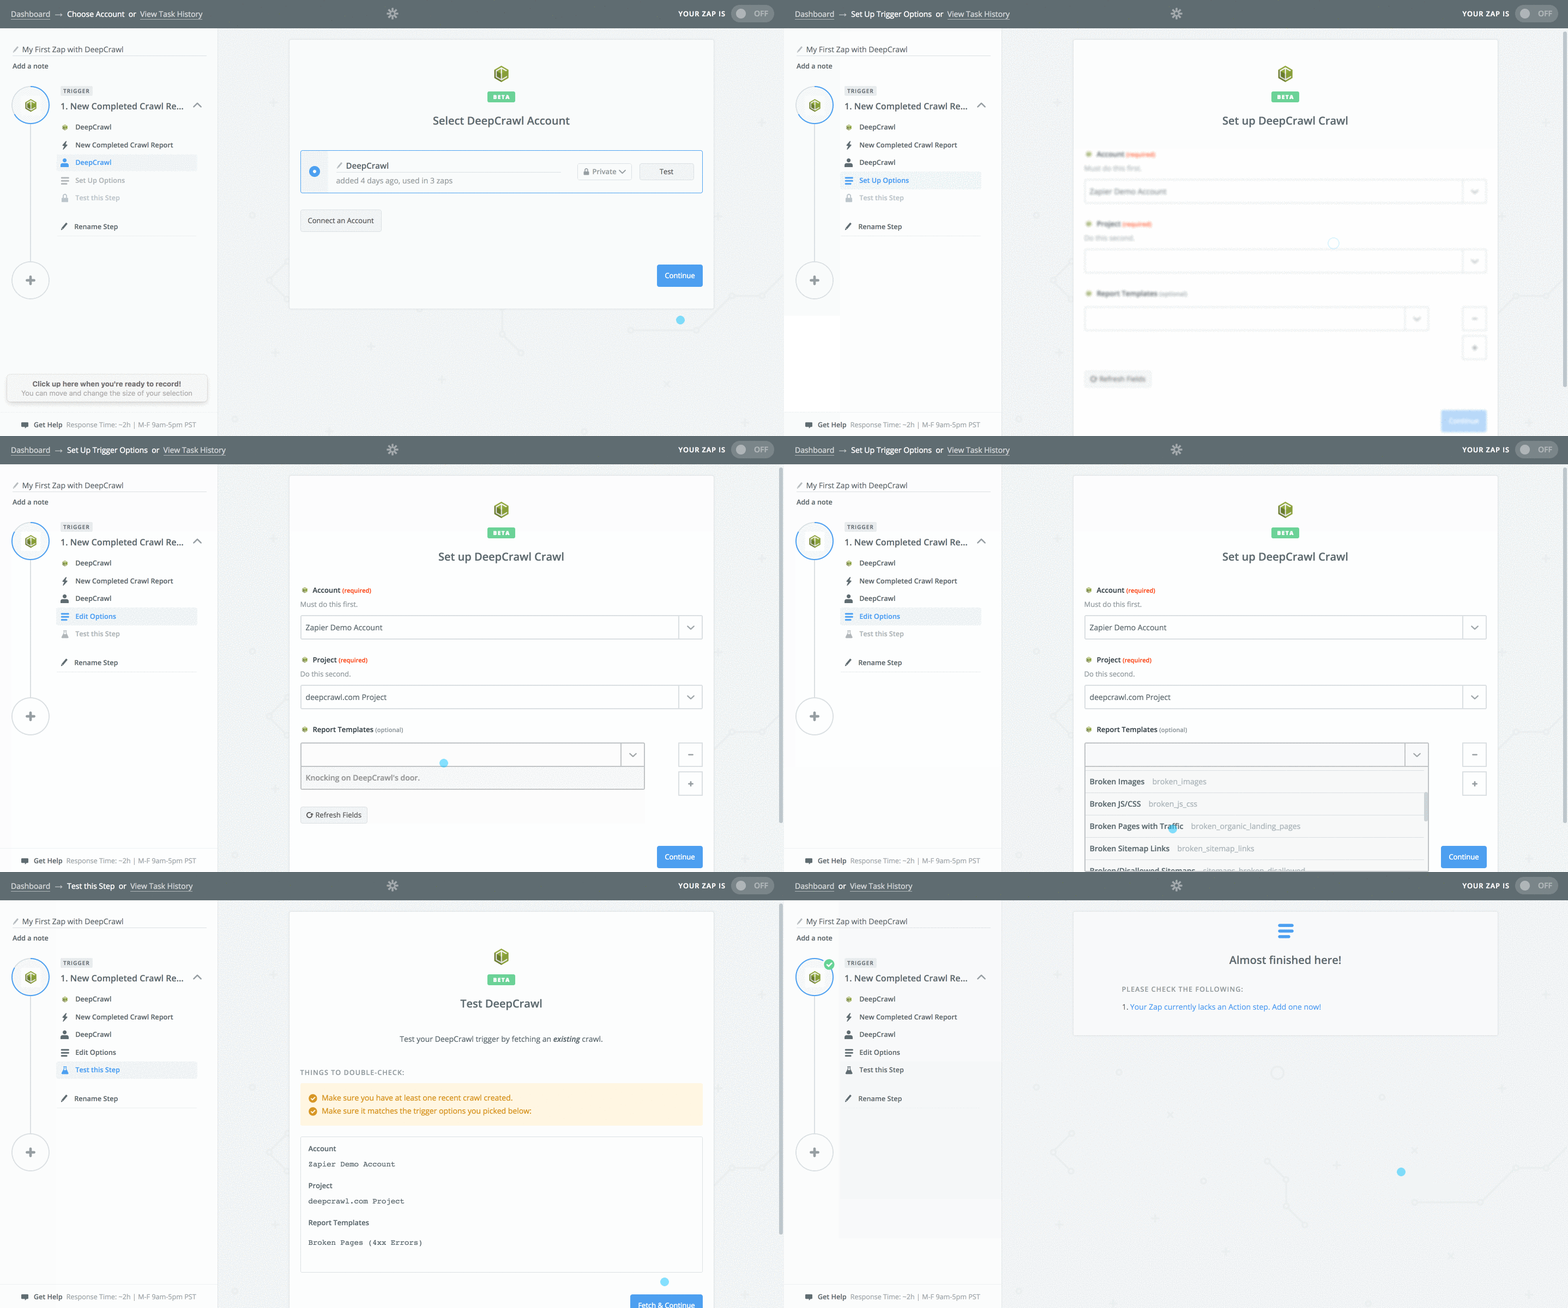
Provided everything was setup correctly you should see a green “Test Successful” message and you can click ‘Continue’. If you see an error message, go back to the ‘Edit Options’ screen and try again.
Setting Up the Action
Now that we have set up the trigger we can set up an Action to create the JIRA ticket. Using the search bar, search for the JIRA app and select it. For this zap we will create a ticket in JIRA, so select ‘Create Issue’ and click ‘Continue’.
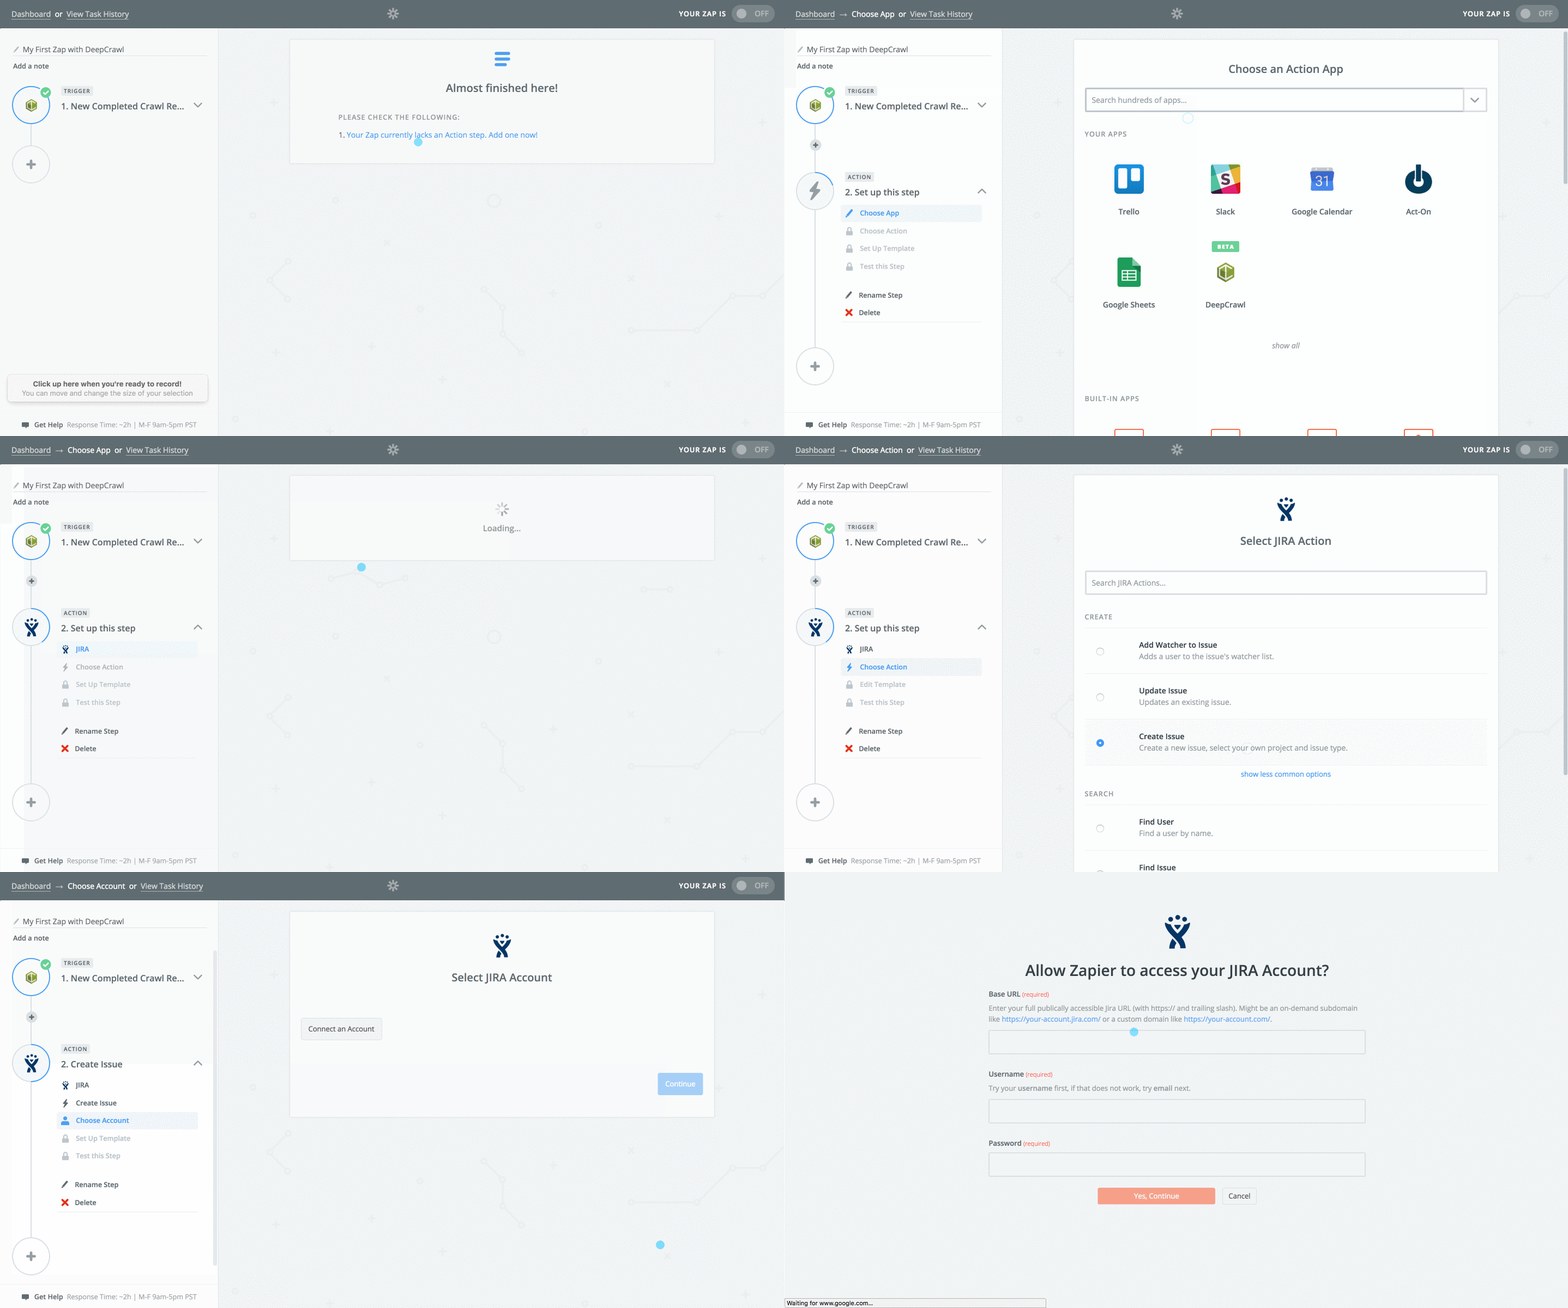
Now you will need to connect your JIRA account to Zapier. To do this, simply click ‘Connect Account’ and a new window will open asking you to enter your JIRA credentials. Simply follow the instructions and click ‘Yes, Continue’ and you will be taken back to Zapier where your JIRA account will now appear in the list. Select the account and click ‘Save + Continue’.
You will now be able to configure how the JIRA ticket should look. First, pick from the dropdown list the JIRA project in which you would like the ticket to be created. Next, for the Issue Type field select the appropriate type e.g. Bug or Task. Next, write a summary title for the ticket. E.g. “Fix Broken Pages on company website” and then, in the message field, copy and paste the following template and replace {project} with the name of your project:
New broken pages have been found for {project} that need fixing.
Amount of Broken Pages:
Link to Report:
The final step is to add in the dynamic data to be pulled from Lumar. To do this, click inside the Description field and click on the plus icon on the right. Select Broken Pages (4xx Errors) Total Rows (this is the total count for the Broken Pages report, but you could also incorporate the Added, Removed or Missing Totals if you wanted). A badge should appear with a sample number inside. Then do the same for the Report Link by selecting Broken Pages (4xx Errors) Href Alt.
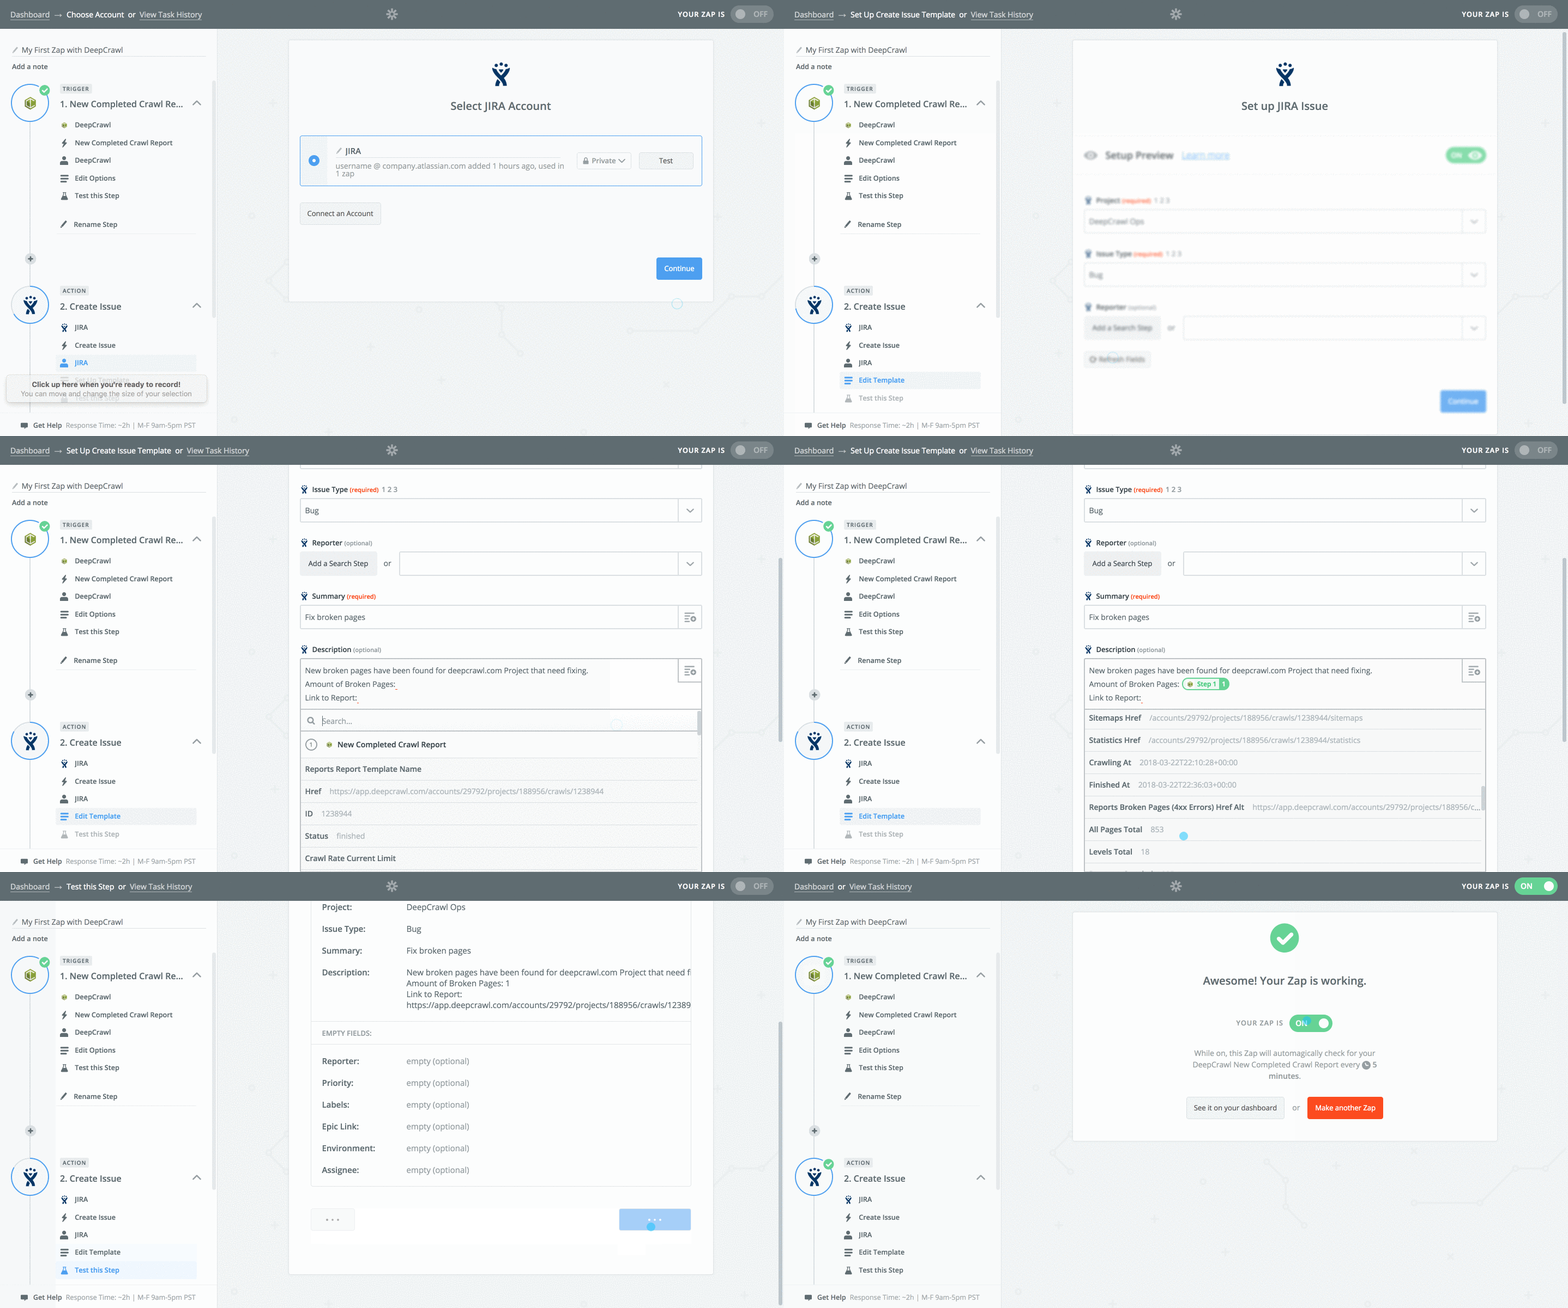
You can then explore the other optional settings for JIRA if you need, perhaps set an assignee for the ticket so that they are always alerted. Otherwise, scroll to the bottom and click ‘Continue’. Again, you’ll see a summary of the configuration, so click ‘Send Test to JIRA’ to test that your configuration will work properly. Once you see the green ‘Test Successful’ message go to your JIRA account to check that the ticket was successfully created, if so click ‘Finish’.
Zap Filters
There’s just one more step to make this Zap truly effective. You would only want a JIRA ticket to be created if there are actually broken pages being flagged in the Broken Pages (4xx Errors) report. One powerful feature in Zapier is the ability to create what’s called a ‘filter’. This makes the Zap only run if a specified rule is met.
To set this up, first click on the plus button on the left below the newly setup Lumar trigger and then click on “Filter”. Make sure to select the filter called “Only continue if…” and then click “Save + Continue”. Next, for the first dropdown select the report count that you want the condition to be based on. In this example the report would be Broken Pages so using the dropdown list select “Reports Broken Pages (4xx Errors) Total Rows”. The second dropdown is where you can select the condition, which in this scenario would be “(Number) Greater than”. Finally, for the last field simply type 0. This filter means that this Zap will only run if the Broken Pages report has more than 0 URLs.
Now that you have finished creating the filter, click ‘Test + Continue’. On the next page you will see confirmation message explaining whether the Zap would or would not have continue based on the filter. Providing this is correct click ‘Continue’, then turn on your Zap and you are done!
If you have any issues in setting up the Lumar trigger or the JIRA action, don’t hesitate to drop us a message and one of our support team will be happy to assist you.

